Original Link: https://www.anandtech.com/show/12416/the-msi-x299-xpower-gaming-ac-motherboard-review
The MSI X299 XPower Gaming AC Review: Flagship Fantasy
by Joe Shields on May 9, 2018 8:00 AM EST- Posted in
- Intel
- MSI
- Motherboards
- X299
- Basin Falls
- Skylake-X
- i9-7900X
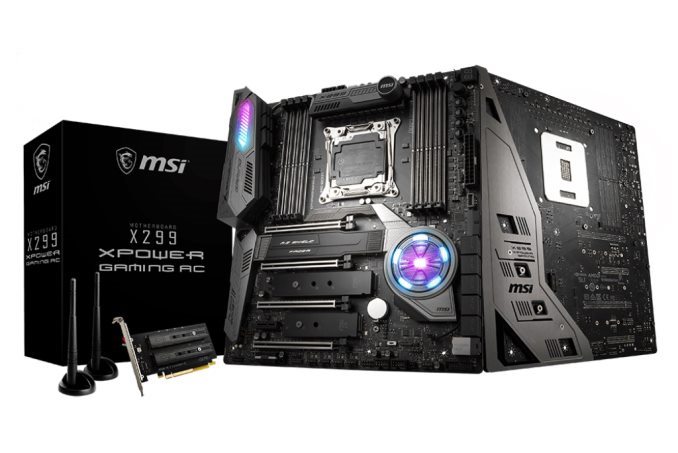
MSI's flagship motherboard for HEDT the X299 XPower Gaming AC. The XPower Gaming AC pulls from its overclocking and enthusiast pedigree as well as including features more focused on gaming, designed to attractive to an even broader audience. MSI also focuses on storage, including U.2 support and the ability to use five M.2 devices out of the box.
MSI X299 XPower Gaming AC Overview
Previous generations of MSI XPower models were primarily focused on extreme overclocking and enthusiasts looking to wring every last MHz out of their CPU. The boards were designed with enough power delivery to be able to handle just about anything thrown at it, as well as some overclocking only accessories. As time has moved on, we have seen the line start to blur the markets between overclocking, enthusiasts, and gaming, and now we have crossover boards, such as this one, which combine the feature sets.
The X299 XPower Gaming AC has a total of four full-length PCIe slots supporting up to 4-Way SLI/Crossfire. The M.2 slots are found in between the PCIe slots, each with their own heatsink. If three M.2 slots are not enough, MSI includes an add-in card for two additional x4 PCIe 3.0 M.2 slots for a total of five. Unique to certain MSI boards, the top M.2 heatsink is hinged at the base with the chipset heatsink and is held in place by a tab which slides to release. The heatsink is designed to be more robust than the other two slots and potentially do a better job cooling. All that being said, the first two M.2 slots are powered by the chipset: only the third M.2 slot uses PCIe lanes from the CPU. In addition to the M.2 slots for storage, the XPower Gaming AC has a U.2 port (also from the chipset) and a total of 10 SATA ports with eight fed from the chipset and two from an ASMedia controller.
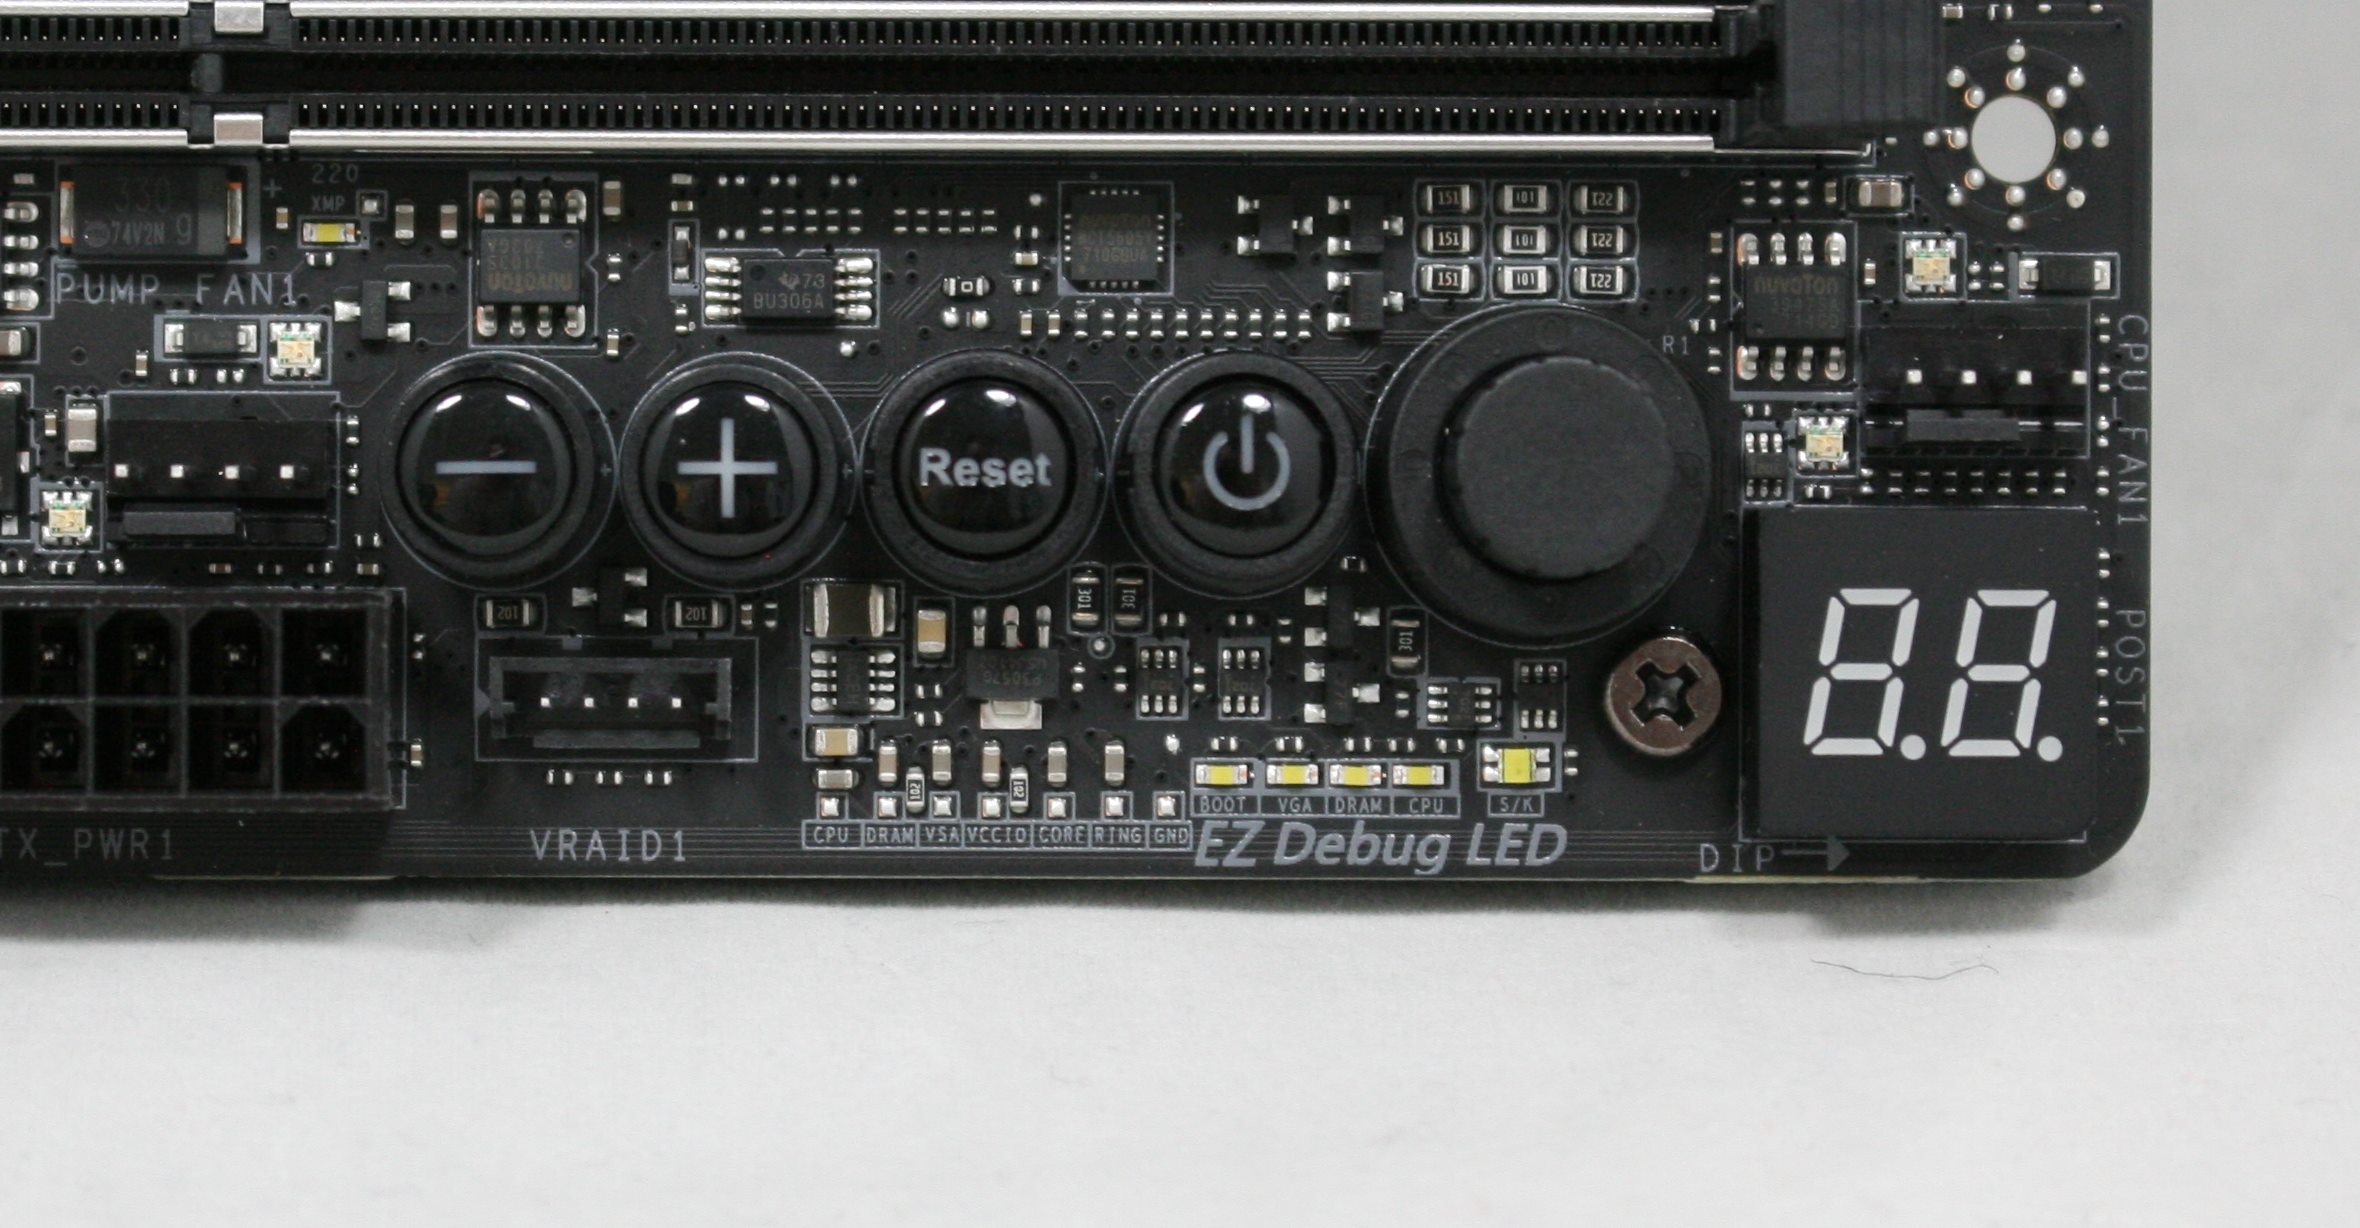
For the overclockers, MSI implements a couple of very useful features, especially when pushing the limits. In the upper right-hand corner, by the debug LED, are plus and minus buttons used to overclock either BCLK and CPU Ratio while in Windows. Right around that area are voltage read points which cover the major voltage domains including Vcore. It also has jumpers to force enter the BIOS bypassing errors, a dual BIOS, and even a slow mode switch used to get through POST at a low clock speed increasing stability when using liquid nitrogen and extreme overclocks.
Performance on the XPower Gaming AC was good all around with it landing in the top half of results in nearly all testing. Its power use results were a bit higher than most boards we have tested, in our long idle and OS idle testing, but only by a few watts did it miss the bell curve. Load power found itself back with the other set of boards we tested, but still on the bottom half looking up at more efficient boards. Boot times were also on the trailing side of average but did manage to be the second fastest (of five) MSI X299 boards we tested. It seems the MSI boards settle a tick or two slower than most other boards in our POST time tests.
In the way of USB connectivity, the XPower has USB 3.1 (10 Gbps) Type-A and Type-C on the rear panel, with ports run from the latest and more efficient ASMedia 3142 controller. In addition to the rear panel, the motherboard does have a header for front panel USB 3.1 (10 Gbps) as well. An ASMedia 1074 hub controls six USB 3.1 (5 Gbps) ports on the back panel, while the X299 chipset manages four more USB 3.1 ports and six USB 2.0 between headers and the back panel.
Networking duties are all Intel - the wired ports are handled by the Intel I219-V and I211AT Gigabit LAN controllers and the wireless card is an AC 8265. Audio comes via an upgraded Realtek ALC1220 solution.
Our manual overclocking results matched that of most other X299 boards using the new CPU. For automatic overclocking, this board, as did the M7 ACK, still implements overly-aggressive voltage profiles too early when using Game Boost.
Being the flagship motherboard, it does come at a price premium. We can currently find the MSI X299 XPower Gaming AC at $440. This price point puts it up against the ASUS Prime X299-Deluxe we recently reviewed at $475, the GIGABYTE X299 Designare EX at $450, And finally ASRock's flagship Fatal1ty X299 Professional Gaming i9 XE priced below it at $390.
MSI X299 Strategy
MSI's X299 XPower Gaming AC holds the current flagship position of MSI's range, and makes its home in the Enthusiast Gaming segment along with the X299 Gaming M7 ACK. At present there are a total of three boards in the Performance Gaming hierarchy, with the Arsenal line that carries the Tomahawk boards. MSI has the standard Pro lineup for more cost-effective options that have slightly fewer features.
| MSI's X299 Motherboard Lineup | |||
| AnandTech Review |
Amazon | Newegg | |
| X299 XPower Gaming AC | [this review] | $450 | $450 |
| X299 Gaming M7 ACK | Review 3/5 | $366 | $380 |
| X299 Gaming Pro Carbon AC | Review 9/21 | $273^ | $330 |
| X299 Gaming Pro Carbon | $320 | $320 | |
| X299M Gaming Pro Carbon AC | Review 3/22 | $277 | $290 |
| X299 Tomahawk AC | $273 | $290 | |
| X299 Tomahawk Arctic | Review 11/20 | $280 | $280 |
| X299 Tomahawk | $256 | $270 | |
| X299 SLI PLUS | Review 11/29 | $232 | $220 |
| X299 Raider | $215 | $220 | |
| X299M-A Pro | - | $237^ | |
^ Third Party Sellers
Information on Intel's X299 and our other Reviews
With Intel's release of the Basin Falls platform, encompassing the new X299 chipset and LGA2066 socket, a new generation of CPUs called Skylake-X and Kaby Lake-X were also released. The Skylake-X CPUs range from the 7800X, a hex-core part, all the way up to an 18-core 7980XE multitasking behemoth. Between the bookend CPUs are five others increasing in core count, as in the table below. The latter HCC models are set to be launched over 2H of 2017.
| Skylake-X Processors | ||||||||
| 7800X | 7820X | 7900X | 7920X | 7940X | 7960X | 7980XE | ||
| Silicon | LCC | HCC | ||||||
| Cores / Threads | 6/12 | 8/16 | 10/20 | 12/24 | 14/28 | 16/32 | 18/36 | |
| Base Clock / GHz | 3.5 | 3.6 | 3.3 | 2.9 | 3.1 | 2.8 | 2.6 | |
| Turbo Clock / GHz | 4.0 | 4.3 | 4.3 | 4.3 | 4.3 | 4.3 | 4.2 | |
| Turbo Max Clock | N/A | 4.5 | 4.5 | 4.4 | 4.4 | 4.4 | 4.4 | |
| L3 | 1.375 MB/core | 1.375 MB/core | ||||||
| PCIe Lanes | 28 | 44 | 44 | |||||
| Memory Channels | 4 | 4 | ||||||
| Memory Freq DDR4 | 2400 | 2666 | 2666 | |||||
| TDP | 140W | 140W | 165W | |||||
| Price | $389 | $599 | $999 | $1199 | $1399 | $1699 | $1999 | |
Board partners have launched dozens of motherboards on this platform already, several of which we will have an opportunity to look over in the coming weeks and months.
Other AnandTech X299 Motherboard Reviews:
- The Intel Skylake-X Review: Core i9-7980XE and Core i9-7960X Tested
- The Intel Skylake-X Review: Core i9-7900X, i7-7820X and i7-7800X Tested
- The Intel Kaby Lake-X Review: Core i7-7740X and i5-7640X Tested
- Intel Announces Basin Falls: The New High-End Desktop Platform and X299 Chipset
- ($480) The ASUS Prime X299-Deluxe Review [link]
- ($450) The MSI X299 XPower Gaming AC Review (this review)
- ($400) The GIGABYTE X299 Gaming 7 Pro Review [link]
- ($390) The ASRock X299E-ITX/ac Review [link]
- ($390) The ASRock X299 Professional Gaming i9 Review [link]
- ($370) The ASUS Strix X299-XE Gaming Review [link]
- ($366) The MSI X299 Gaming M7 ACK Review [link]
- ($340) The ASUS X299 TUF Mark 1 Review [link]
- ($330) The EVGA X299 FTW-K Review [link]
- ($308) The MSI X299 Gaming Pro Carbon Review [link]
- ($305) The MSI X299M Gaming Pro Carbon AC [link]
- ($290) The EVGA X299 Micro Review [link]
- ($290) The ASRock X299 Taichi Review [link]
- ($260) The MSI X299 Tomahawk Arctic Review [link]
- ($232) The MSI X299 SLI Plus Review [link]
- ($200) The ASRock X299 Extreme4 Review [link]
To read specifically about the X299 chip/platform and the specifications therein, our deep dive into what it is can be found at this link.
To read specifically about the X299 chip/platform and the specifications therein, our deep dive into what it is can be found at this link.
X299 Motherboard Review Notice
If you’ve been following the minutiae of the saga of X299 motherboards, you might have heard some issues regarding power delivery, overclocking, and the ability to cool these processors down given the power consumption. In a nutshell, it comes down to this:
- Skylake-X consumes a lot of power at peak (150W+),
- The thermal interface inside the CPU doesn’t do much requiring a powerful CPU cooler,
- Some motherboard vendors apply Multi-Core Turbo which raises the power consumption and voltage, exacerbating the issue
- The VRMs have to deal with more power, and due to losses, raise in temperature
- Some motherboards do not have sufficient VRM cooling without an active cooler
- This causes the CPU to declock or hit thermal power states as to not degrade components
- This causes a performance drop, and overclocked systems are affected even more than usual
There has been some excellent work done by Igor Wallossek over at Tom’s Hardware, with thermal probes, thermal cameras, and performance analysis. The bottom line is that motherboard vendors need to be careful when it comes to default settings (if MCT is enabled by default) and provide sufficient VRM cooling in all scenarios – either larger and heavier heatsinks or moving back to active cooling.
MSI X299 XPower Gaming AC Visual Inspection
The X299 XPower Gaming AC is listed as an E-ATX sized motherboard though it doesn't exactly fit the specification. The EATX standard specification is 12 x 13-inches, but sometimes OEMs take a bit of liberty with the specification. MSI takes that liberty with this board and it measures in at 10.7-inches wide and 12-inches top to bottom. It will still fit all standard ATX mounting so we do not have any worries on that front, but as it is larger from left to right it will not go directly into strict ATX standards, hence the E-ATX designation.
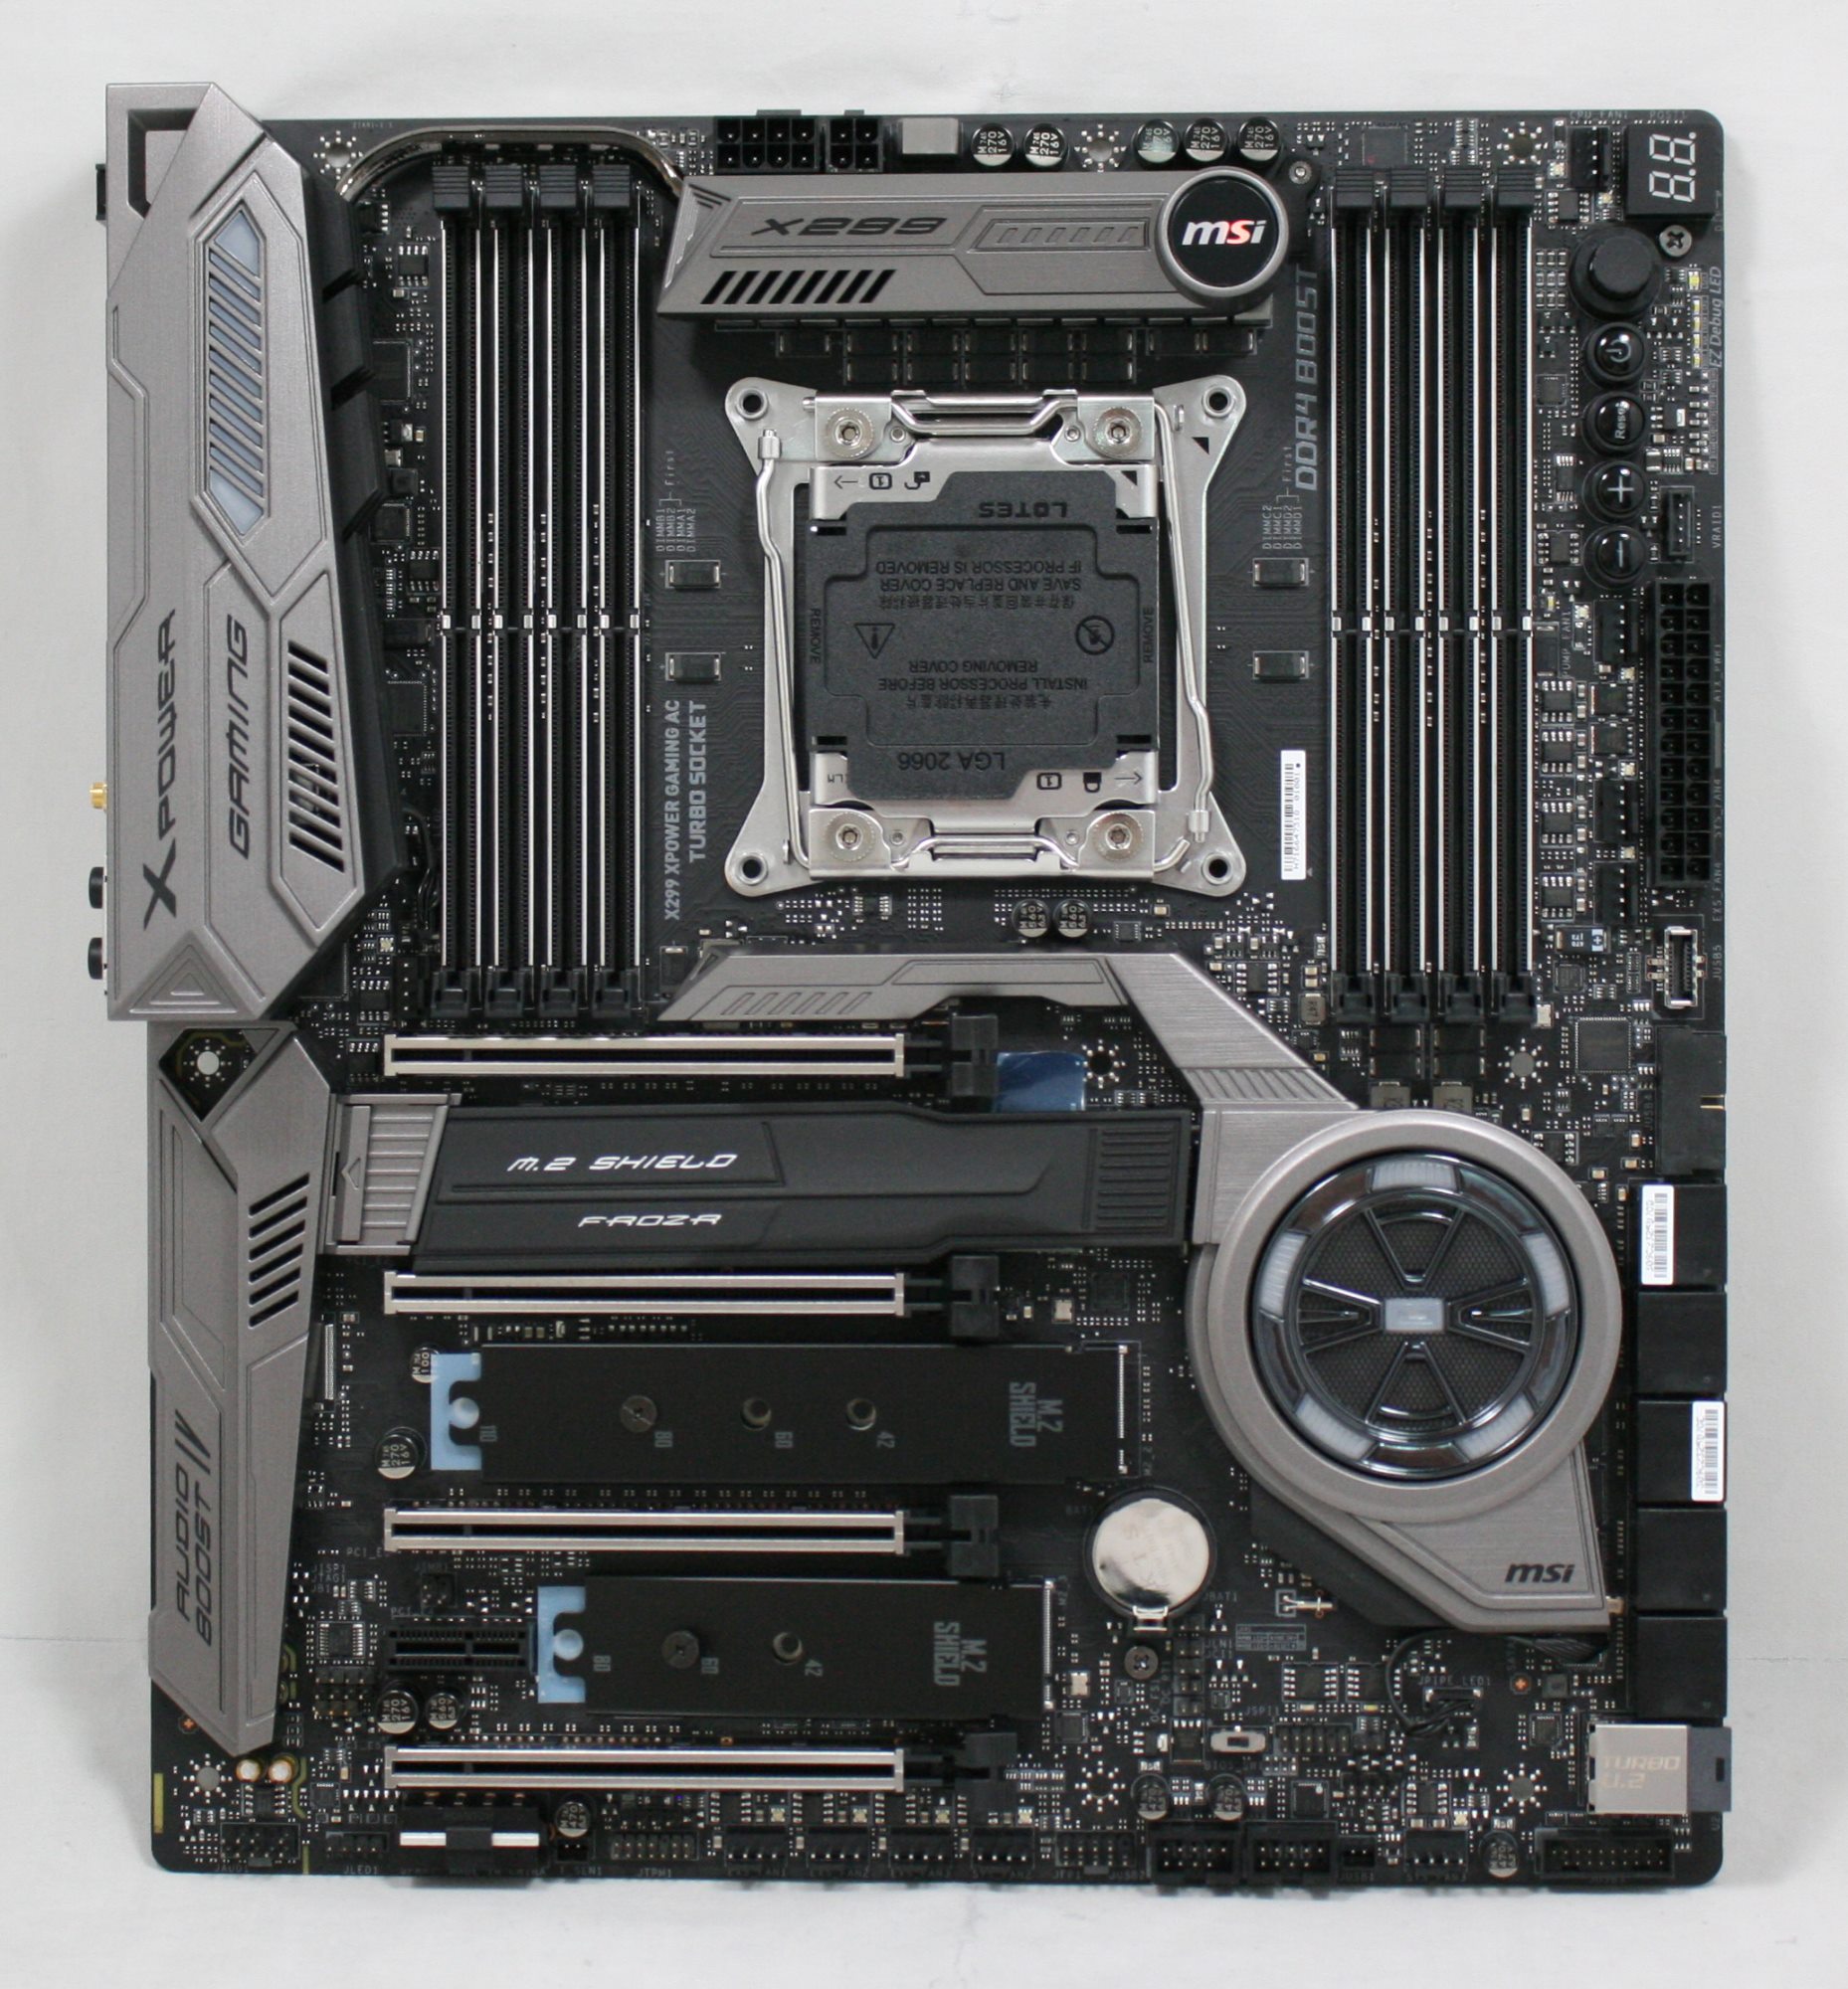
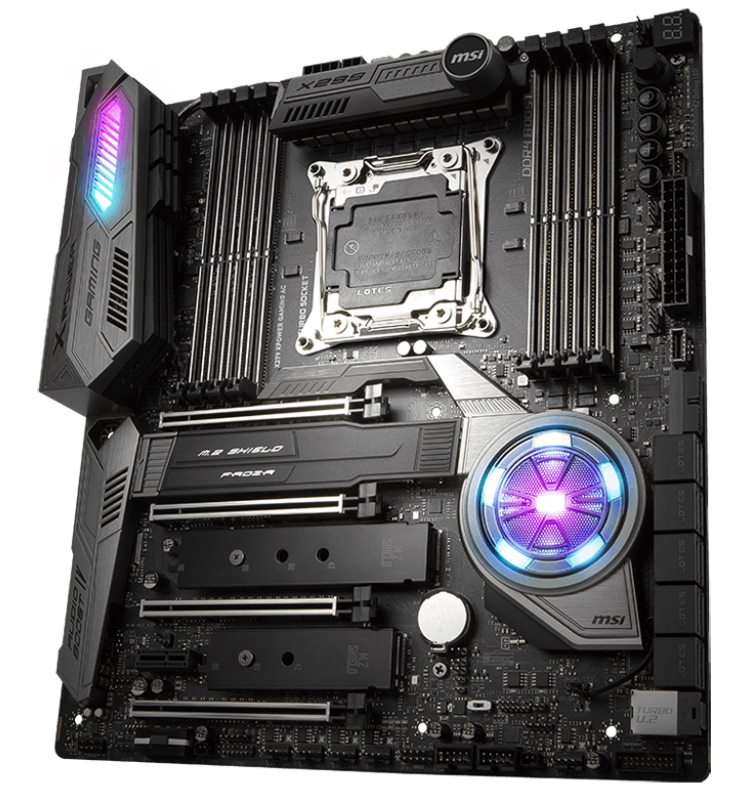
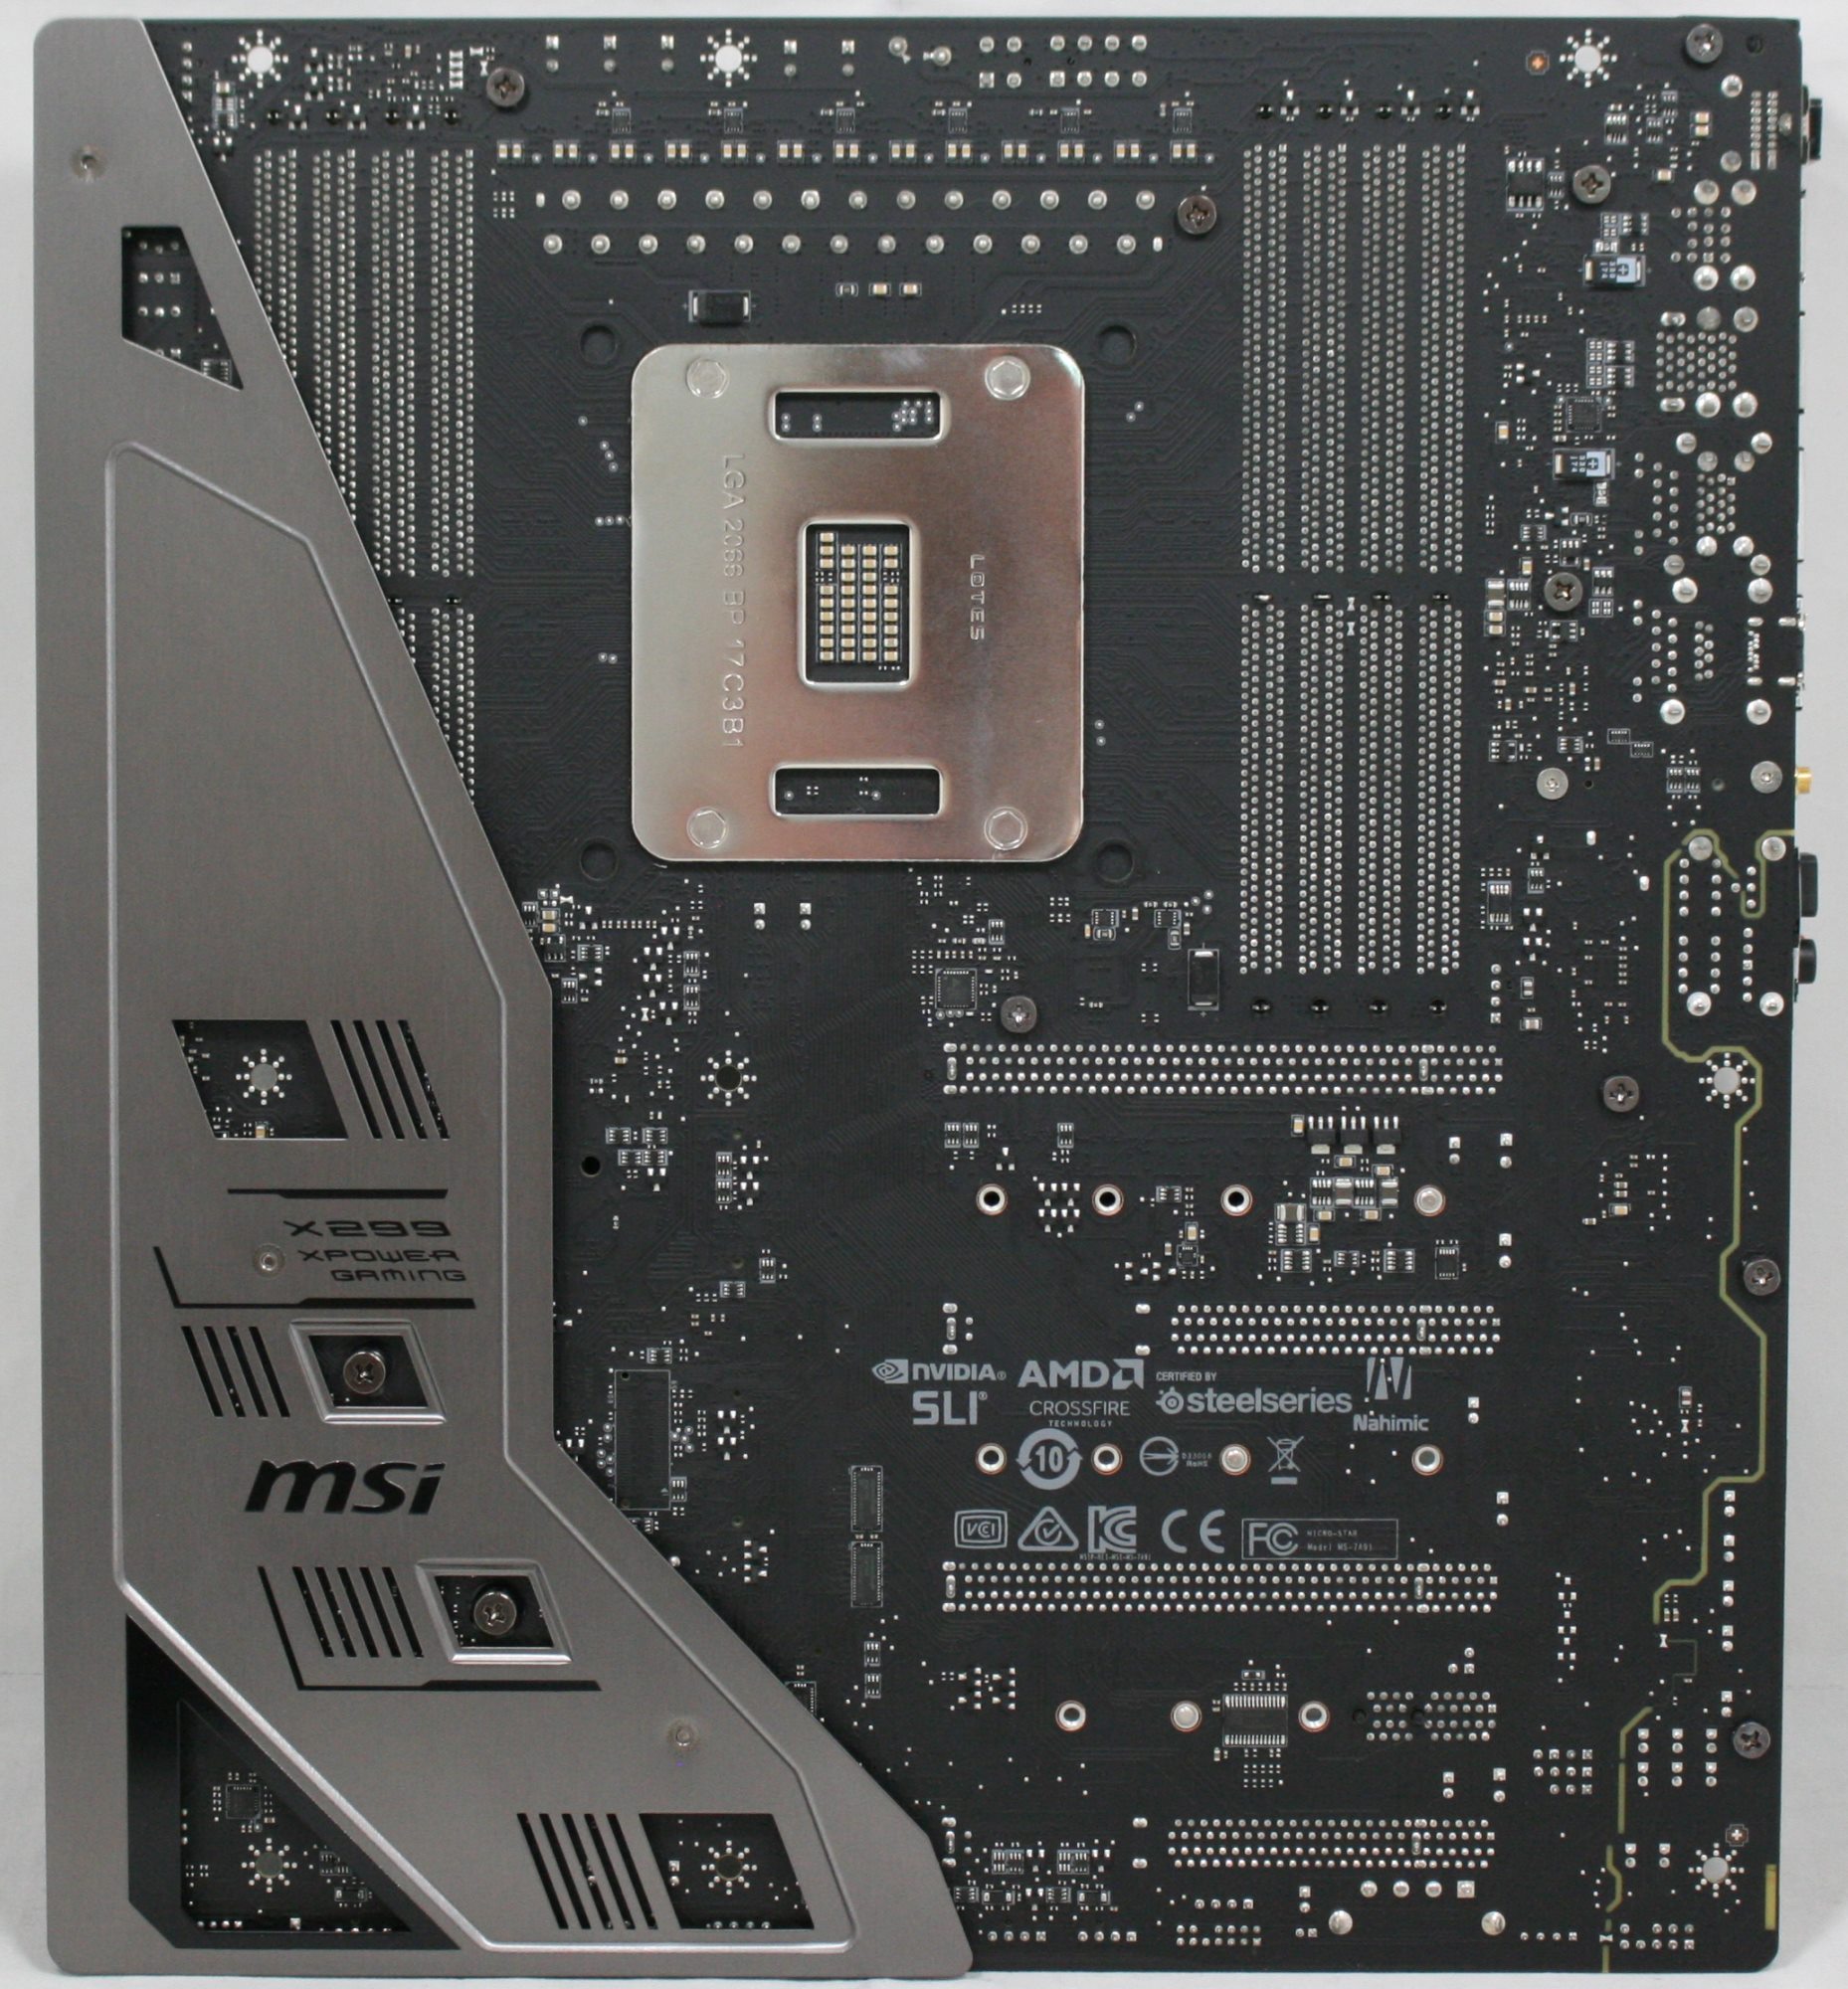
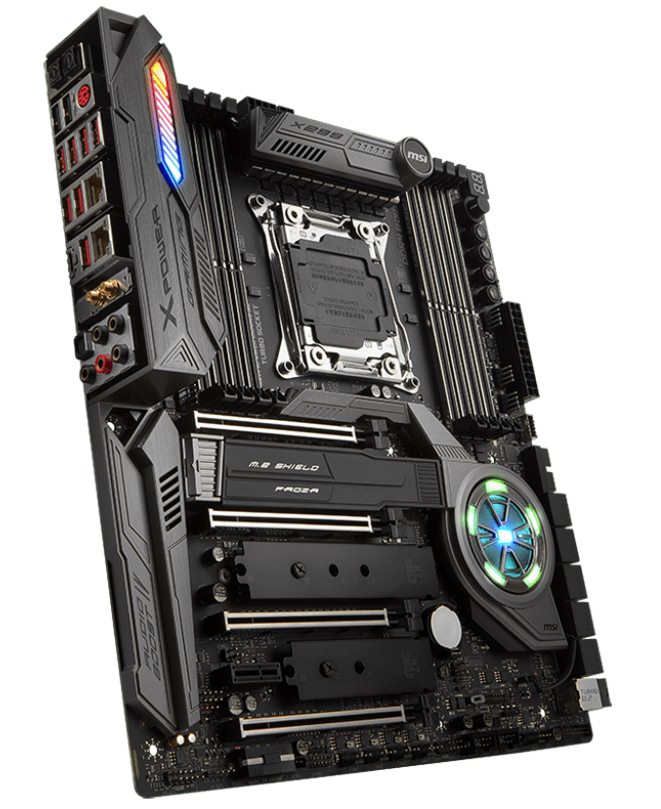
Size aside, the XPower Gaming AC looks like a standard fare motherboard as far as aesthetics go, with a black PCB and grey shrouds all around. On the back of the motherboard, we can see it has a cover on it to increase rigidity.
The board's eight DRAM slots and four full-length PCIe slots are reinforced via MSI's Steel Armor to support heavy graphics cards and also assist with the look. The three M.2 slots all have a heatsink on them, with the bottom two as basic M.2 shields - a thin piece of metal. The top slot uses a larger heatsink, dubbed the M.2 Shield Frozr. The heatsink on the top M.2 slot has a lot more mass to it which should help keep the module underneath cooler than the thinner heatsinks. The M.2 Shield Frozr also has a locking mechanism to keep the hinged heatsink (and drive) securely in place.
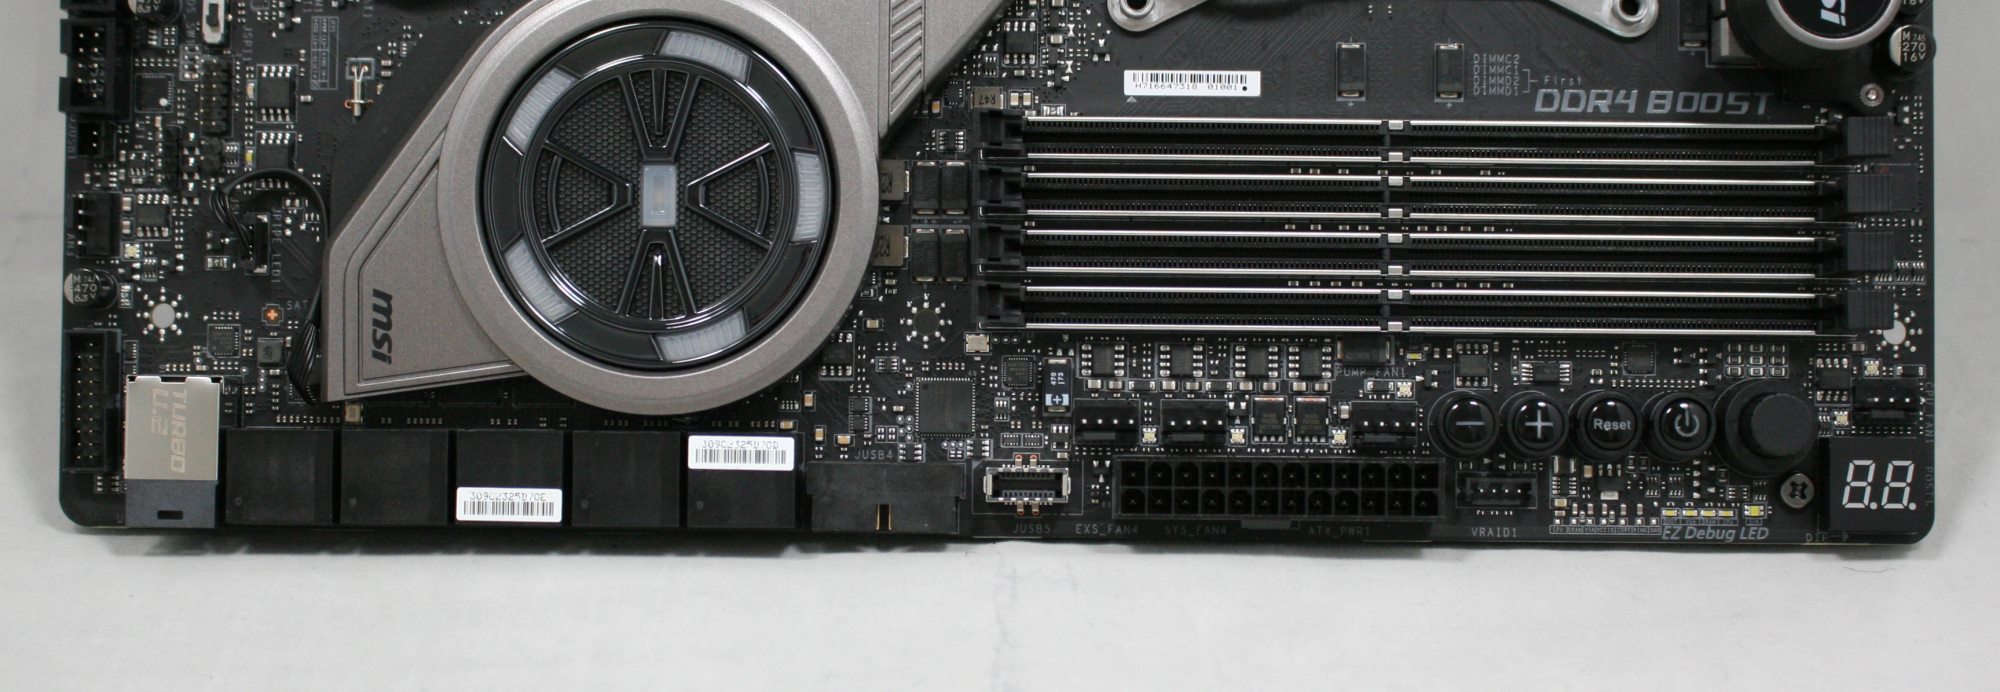
All the shrouds are a gray color contrasting a bit from the black PCB. The chipset shroud looks almost like a reactor core and is one of the locations of the board's RGB LEDs. The other is in the back panel IO shroud towards the top. Outside of that, there are LEDs on the board on the memory slot, to show which are populated. Overall the RGB implementation was minimal but did give the board some character.

The X299 XPower Gaming AC is equipped with a total of 10 headers, each capable of controlling the fans through PWM or DC methods. The fan headers are located on the right side of the board, across the bottom, and one in the middle of the board above the PCIe slot and to the left of the left bank of DRAM slots. MSI documentation doesn't mention the power output of the headers.
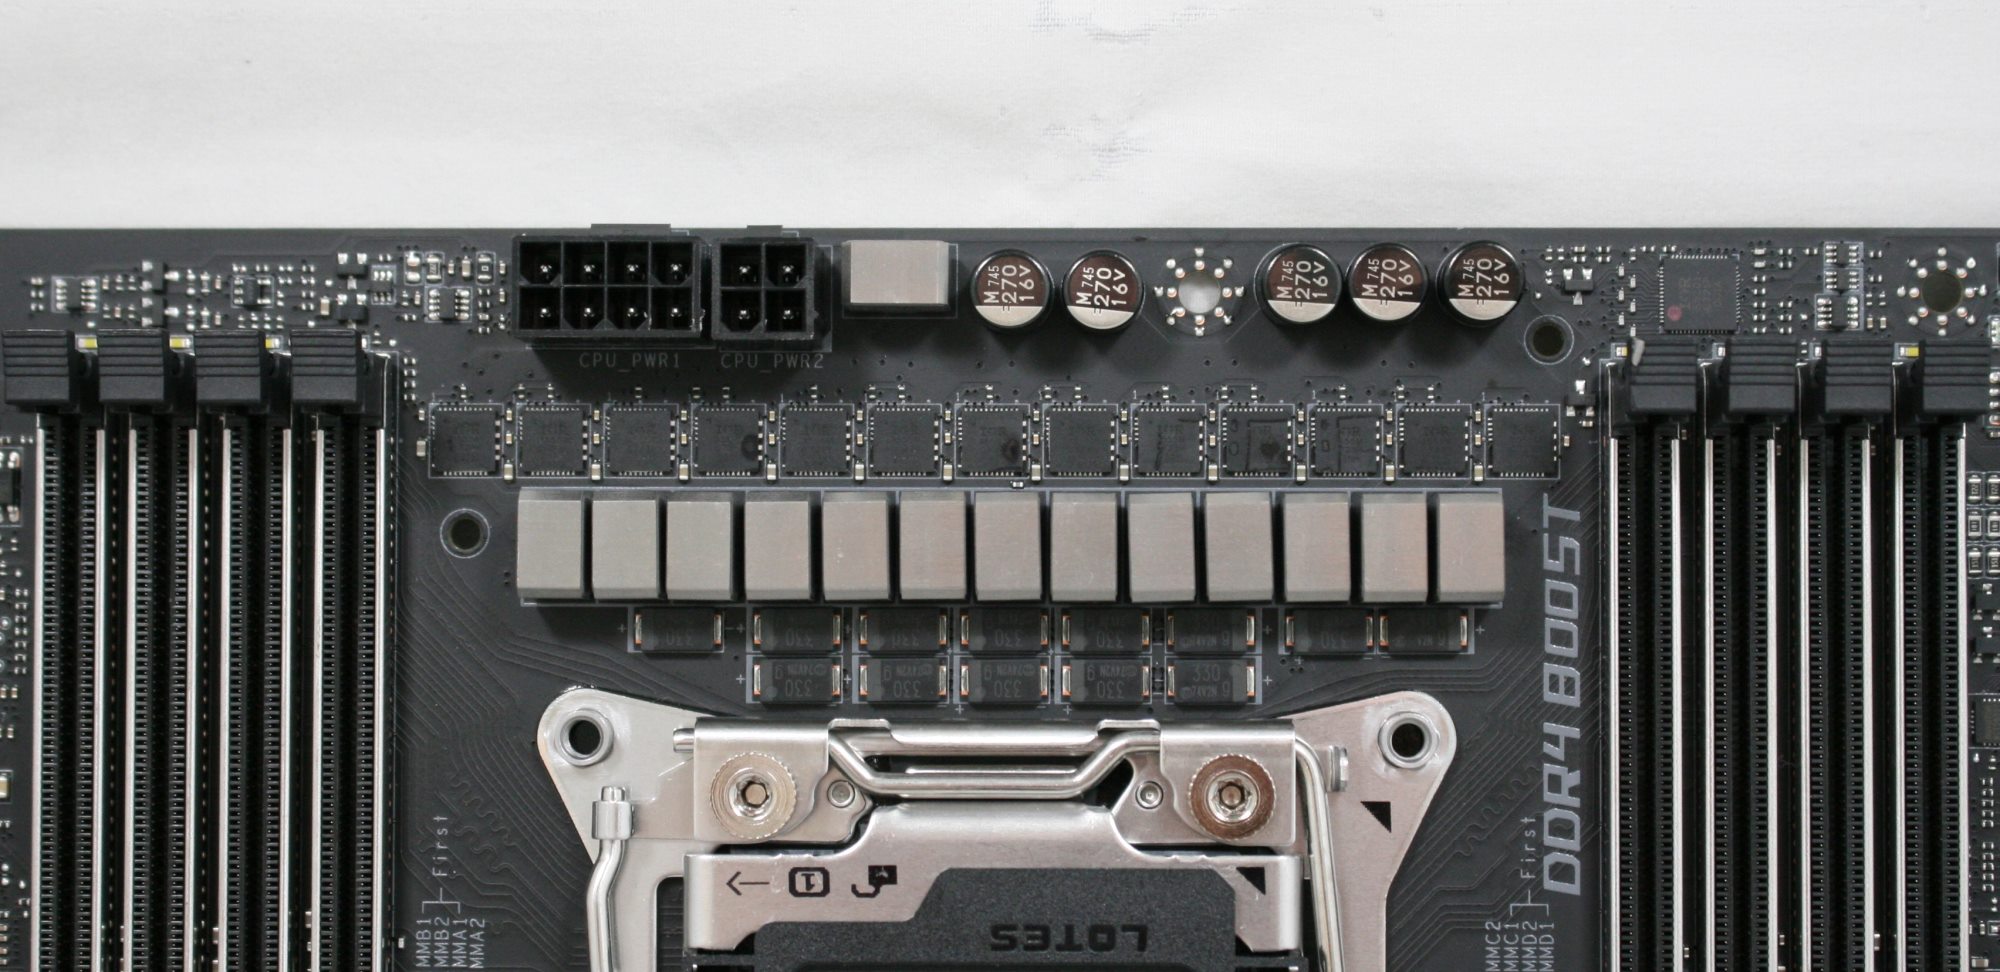
Stripping away the dual heatsinks used to cool the power components, we see a closeup shot of its 14-phase power delivery (12 for CPU). The XPower Gaming AC uses an IR35201 controller in 6+1 phase mode with the '+1' used for CPU VCCSA. This means the six PWM channels are doubled to 12 (IR3599 phase doublers on the back). This yields a total of 13 phases under this heatsink with each phase using an IR3555M 60A fully integrated PowIRstage. For VCCIO, an IR35204, a 3+1 controller, will control the single-phase VCCIO along with a Texas Instruments NexFET CSD87350Q. The memory VRMs are using Primarion PV4210 digital PWMs along with each phase using two 25A/40A NexFETs (CSD87350Q). Delivering power to these ICs is a required 8-pin 12V EPS connector and an optional 4-pin EPS 12V connector. Overall this is one of the more capable power delivery sections we have seen and it has ample cooling with dual heatpipe attached heatsinks.
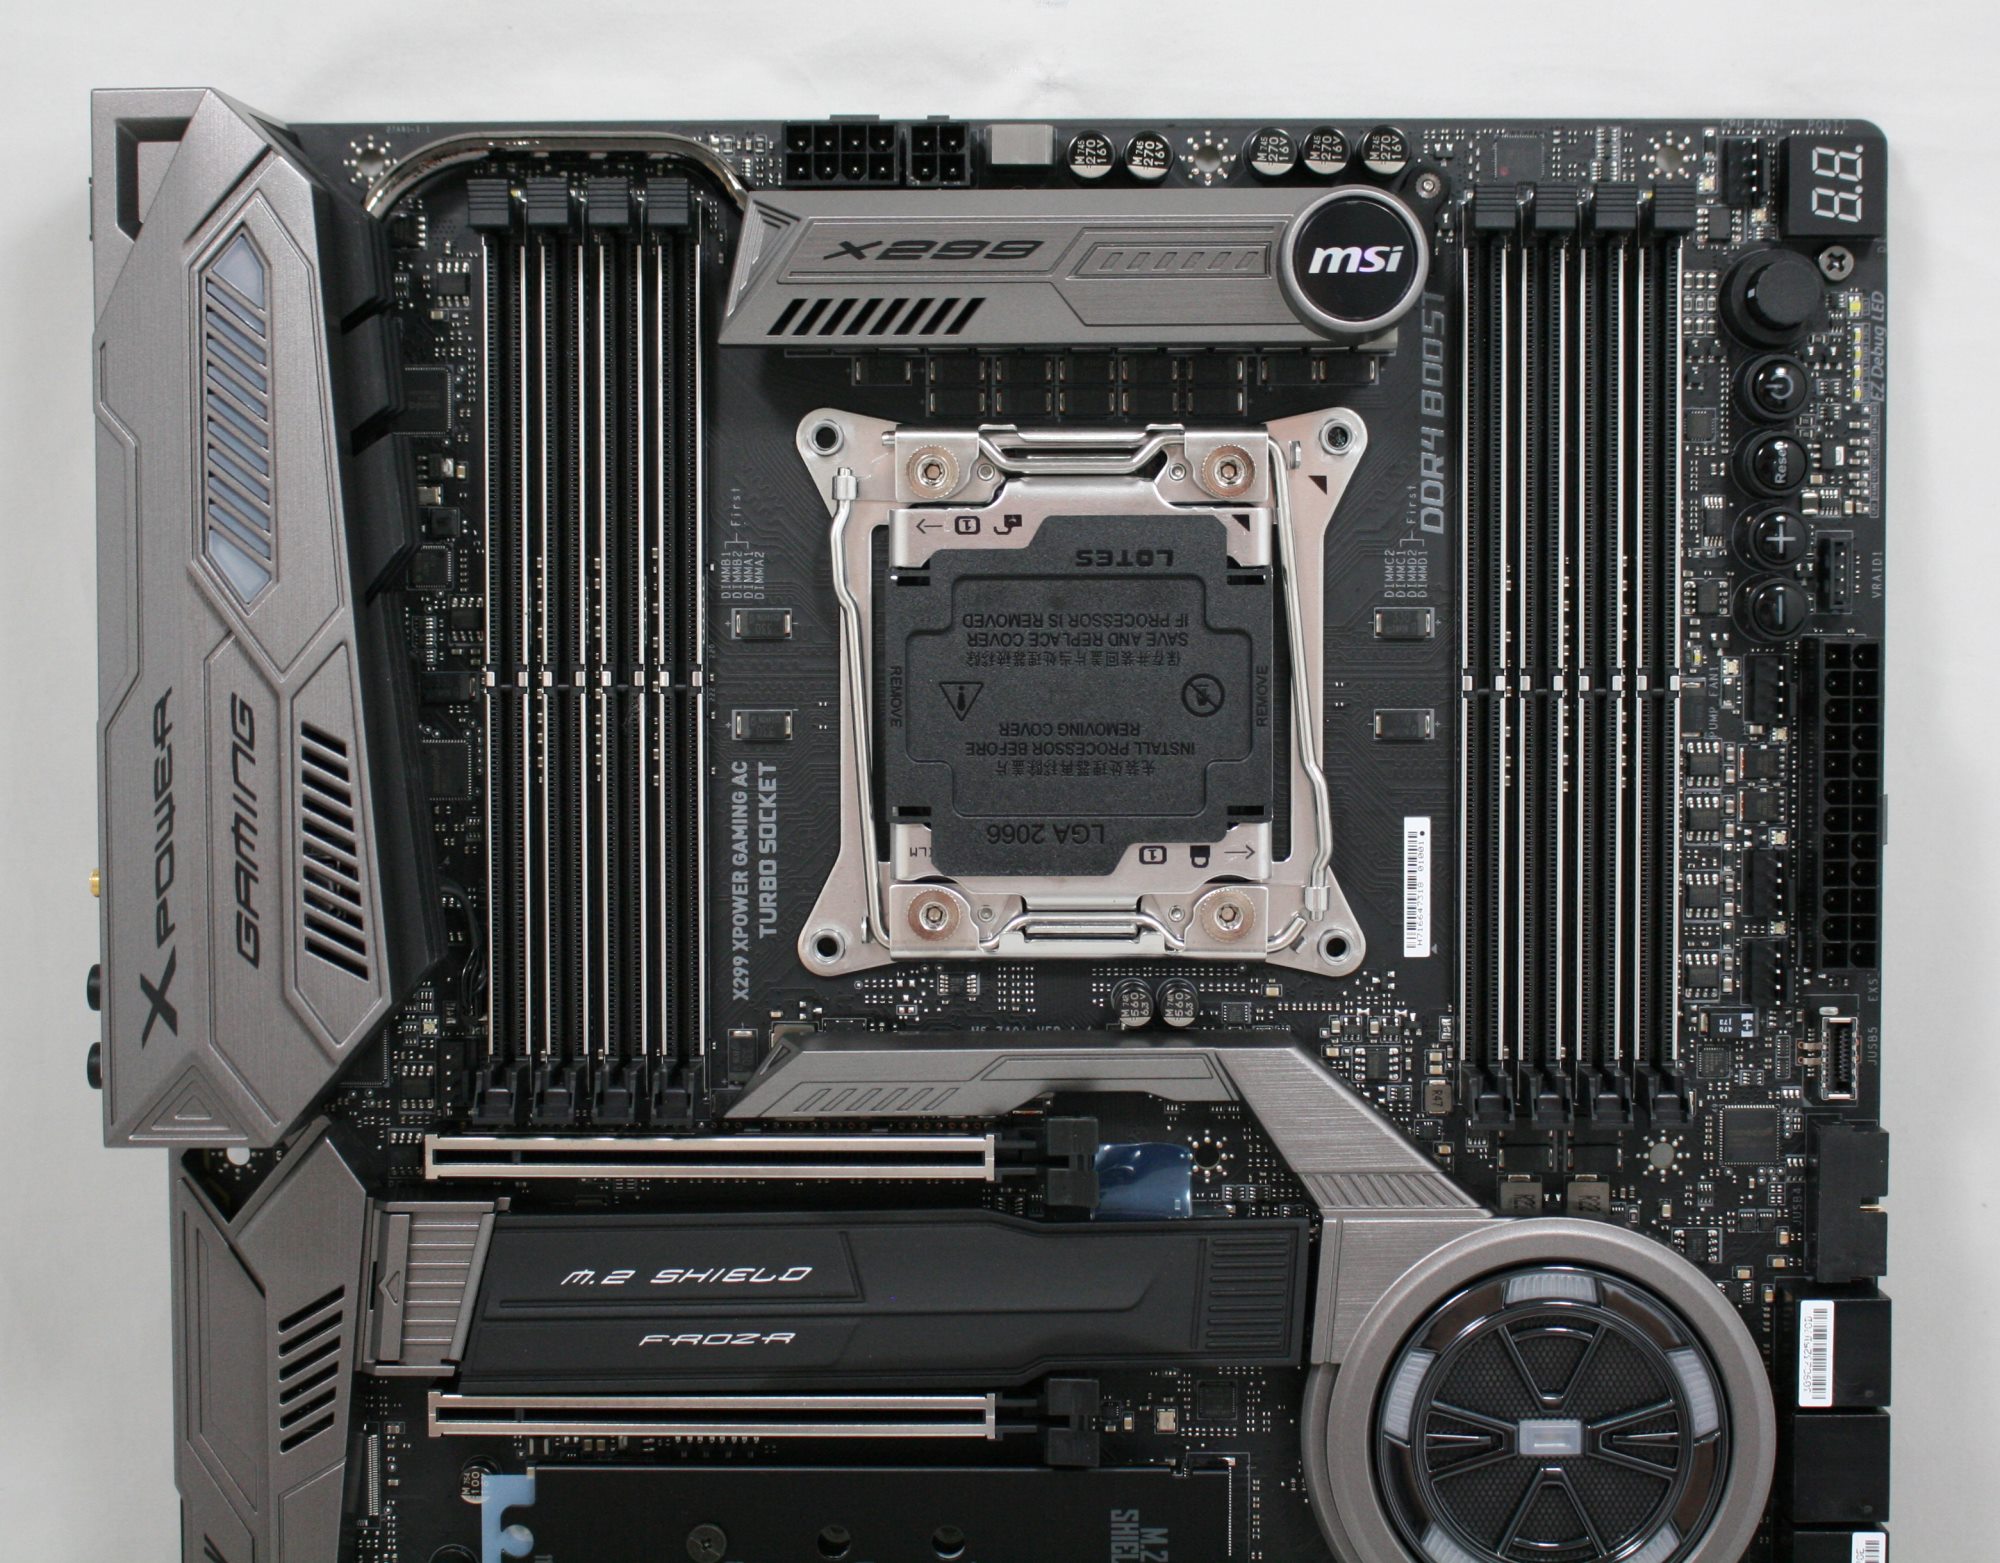
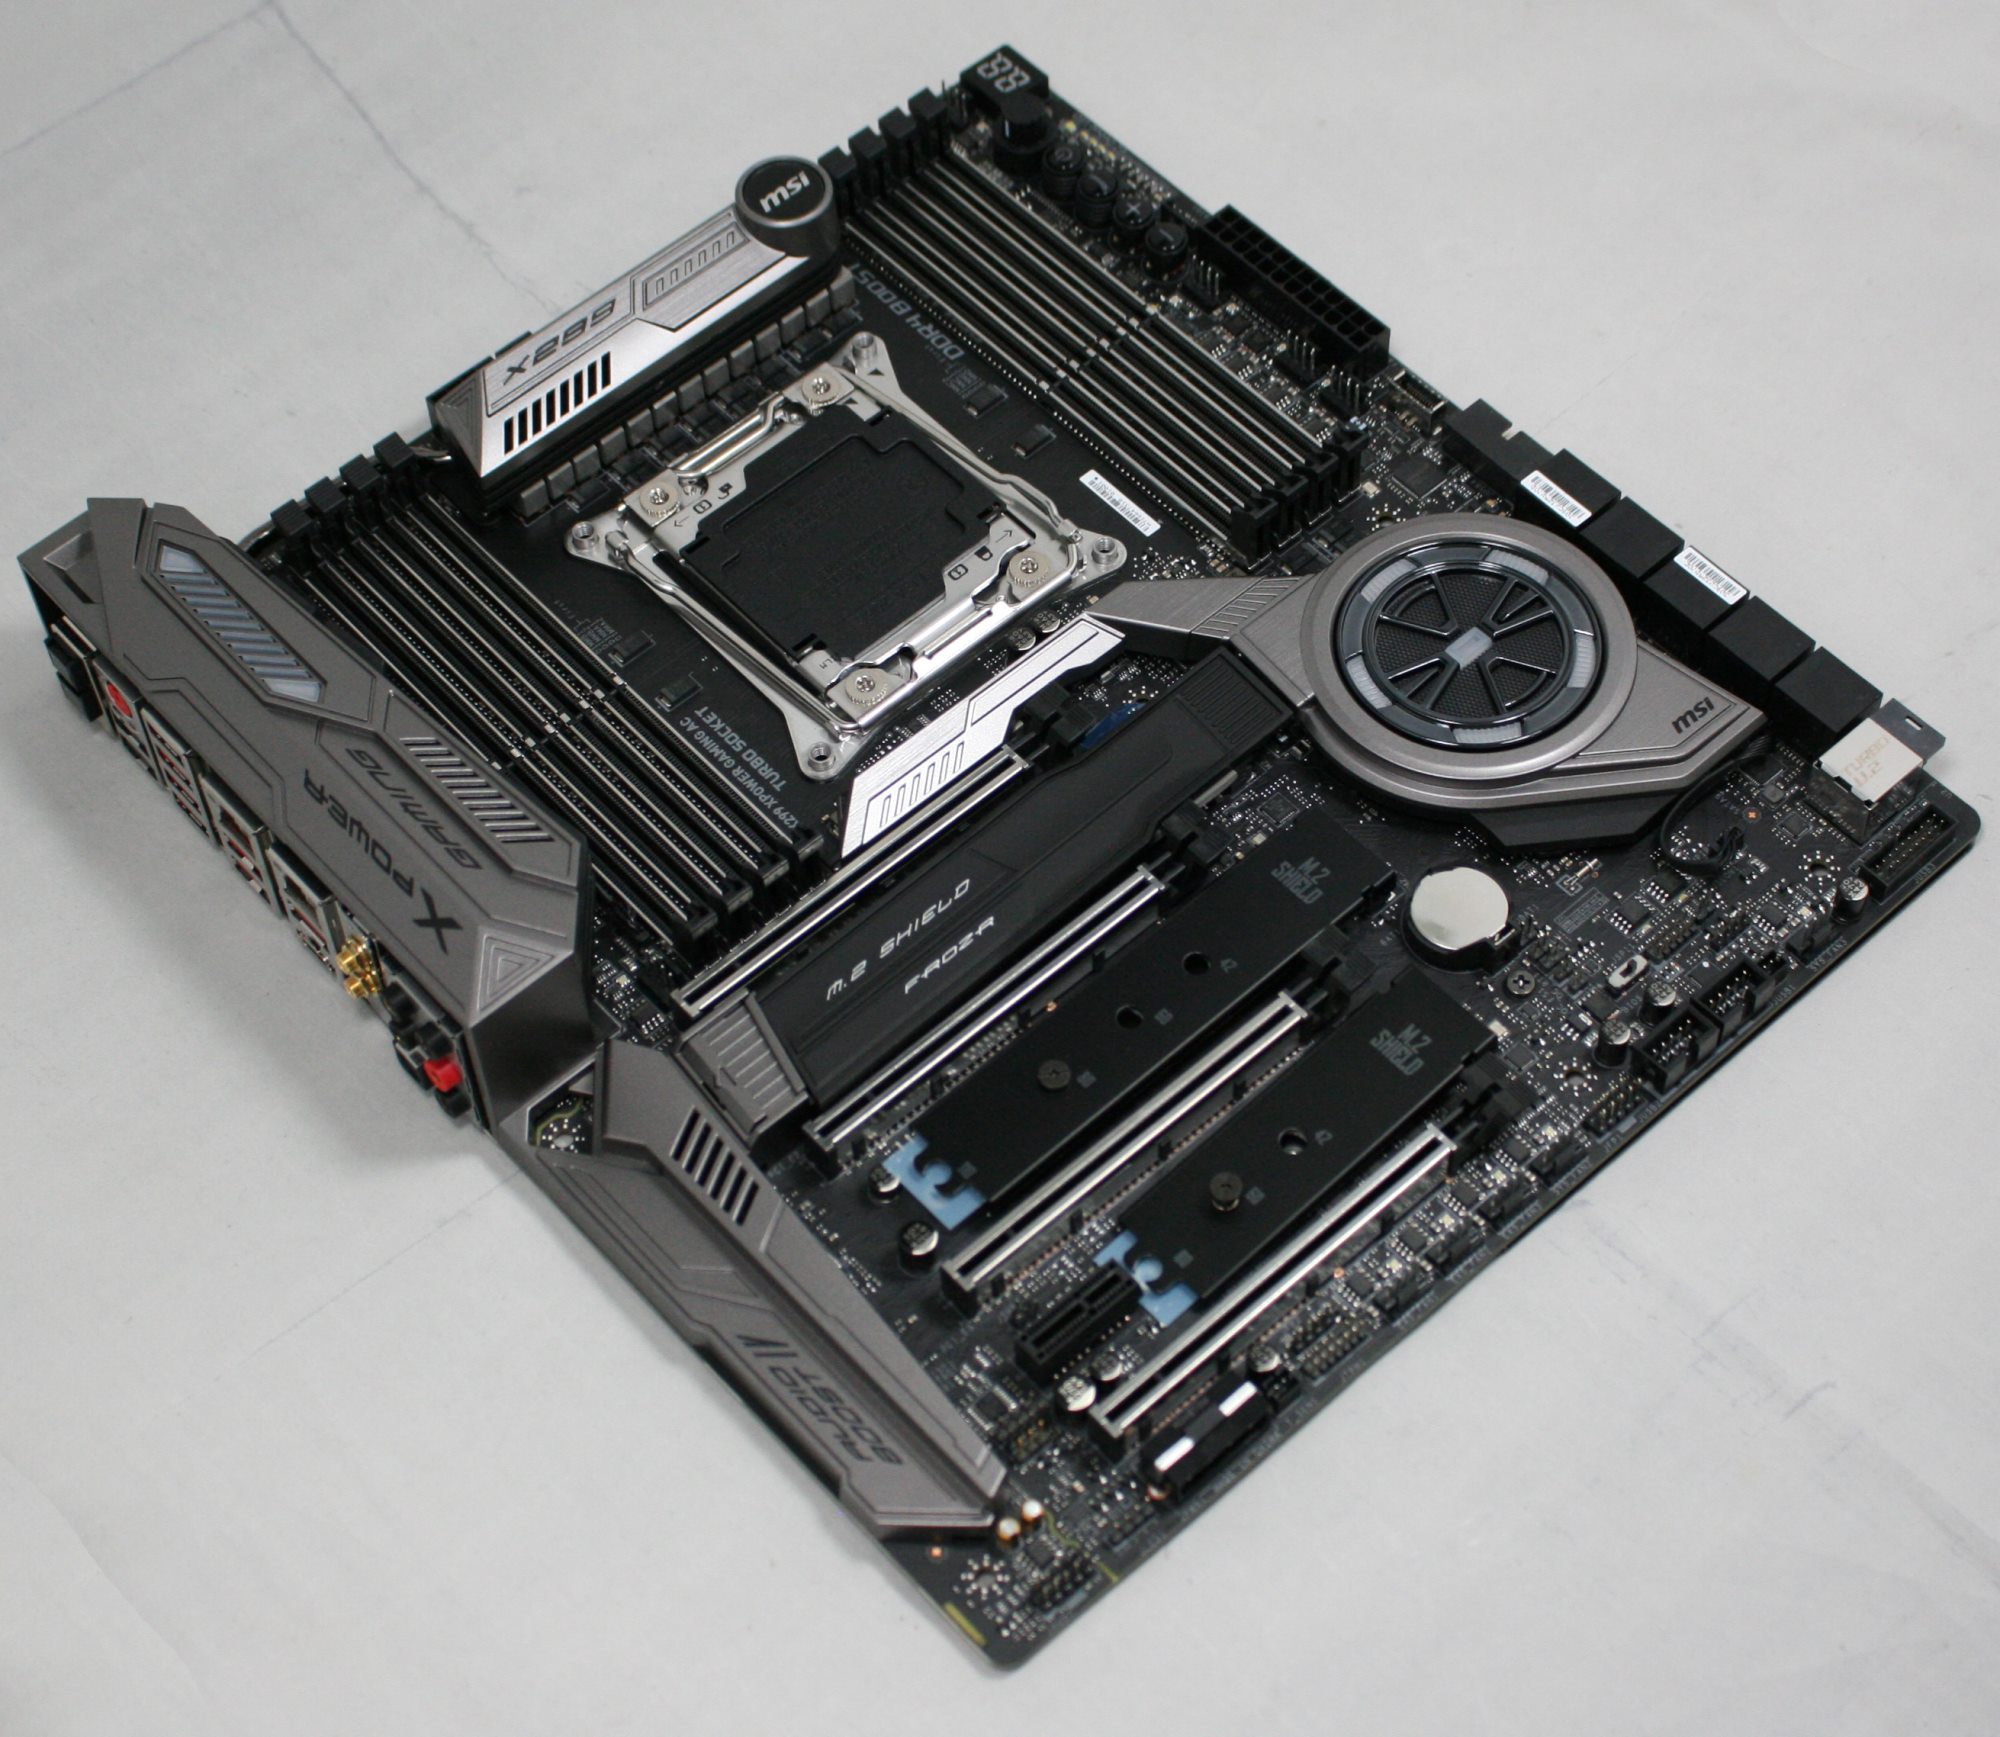
The top half of the board shows our typical arrangement of eight DRAM slots flanking the CPU socket. The 14 total phase power delivery sits above it and is attached to two heatsinks connected via the heat pipe we see snaking above the left DRAM slots and into the second heatsink. The primary heatsink is on the smaller side, but on the other end is something a bit beefier. Combined, this solution worked out well both at stock and when overclocked to 4.5 GHz.
The right side of the board has a host of different gadgets in that area. We can see the debug LED, power/reset buttons and +/- buttons for overclocking BCLK and CPU Ratio on the fly. The EZ Debug LEDs for Boot, VGA, DRAM, and CPU, as well as a 5th LED to show what kind of CPU is in the socket. Also located in this area are the voltage read points and the Game Boost knob.
The right side of the board we are able to see the top of the U.2 port, and its 10 SATA ports on the left side. We can also see a front panel USB 3.0 header and the front panel USB 3.1 (10 Gbps) header as well. Next to it is the 24-pin ATX power connector and the header for Intel VROC. Zooming in a bit on that right-hand corner, the EX Debug LEDs cover CPU, DRAM, VSA, VCCIO, Core, Ring, and also has a grounding pad. Having voltage read points are important when extreme overclocking so users are able to know the exact voltage going into any of the domains. I would like to have seen the read points a lot larger and easier to 'attach'. MSI used to have pins on the read points and a plastic shroud around them which held the ends of the digital multimeter for you and allows leaving them in there.

Here we see a closer look at the 10 SATA ports and U.2 port for storage attachment. Eight of the ten ports go through the chipset while the other two are handled by an ASMedia ASM1061 controller. The M.2 ports and SATA ports share bandwidth so some concessions may need to be made when using SATA-based multiple M.2 devices. For example, the first M.2 slot (with the large cooler) will render SATA1 disabled while the rest are enabled. The second and third slots are a bit more complicated. I have included an image of the combination table from the manual in the gallery.
For the three onboard M.2 slots, despite the first slot being with the large cooler, it is actually powered through the chipset, as is the second slot. Only the third slot comes from the CPU, in some configurations being switched with the PCIe lanes in the bottom slot as demonstrated in the table below.
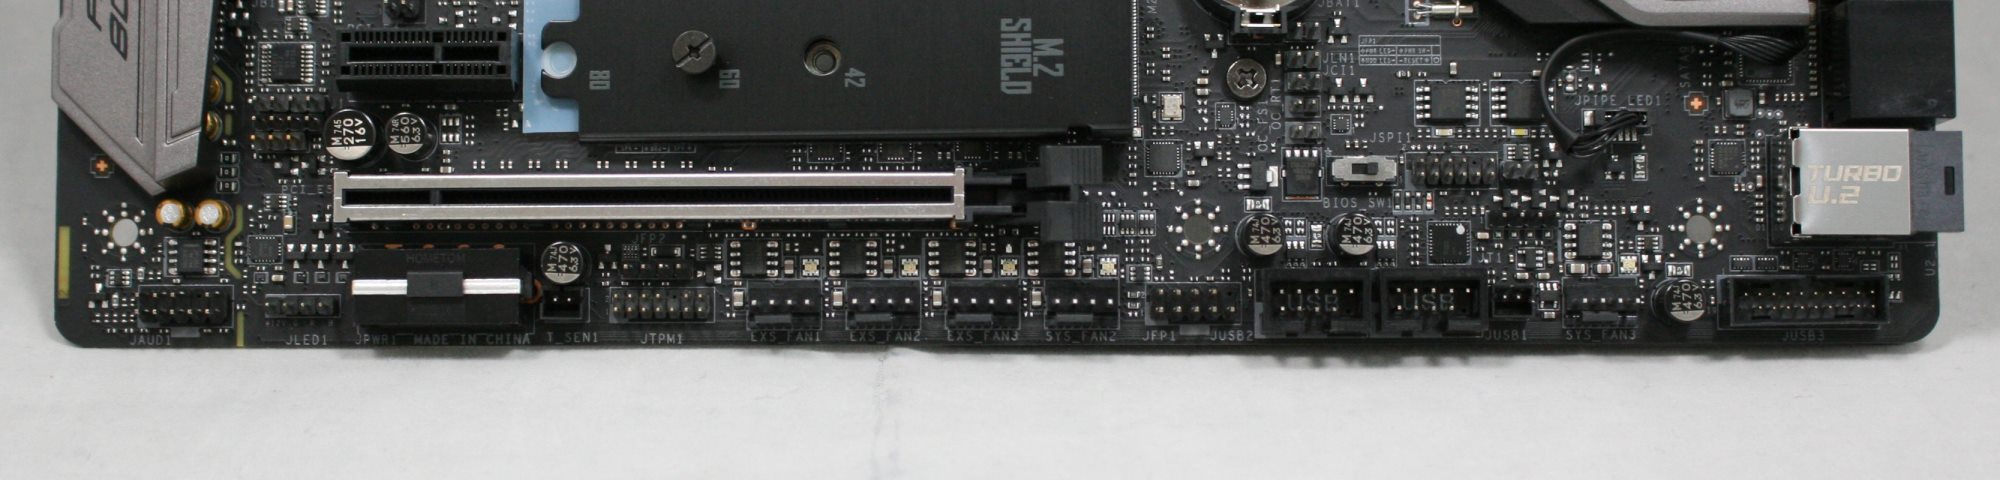
Across the bottom of the board are the headers. Located just above the USB 2.0 headers is the BIOS switch for its dual BIOS capabilities, the direct to BIOS header, as well as the slow mode switch.
From left to right we have:
- Front Panel Audio
- RGB LED connector
- Molex Power (supplement PCIe power)
- Thermal Sensor header
- TPM Module connector
- 4 x Fan headers
- Front Panel connector
- 2 x USB 2.0 headers
- LED Light demonstration power header
- System Fan header
- Front Panel USB 3.0 header
The bottom half of the board shows off the reinforced PCIe slots and the M.2 Shield Frozr on the first M.2 slot. We can see shrouding covering the Realtek ALC1220 codec and its Chemi-con audio capacitors. The board also separates audio from the rest of the board, as well as separate PCB layers for left and right channels. For headphone users, there is a dedicated headphone amplifier which auto-detects impedance, up to 600Ω.
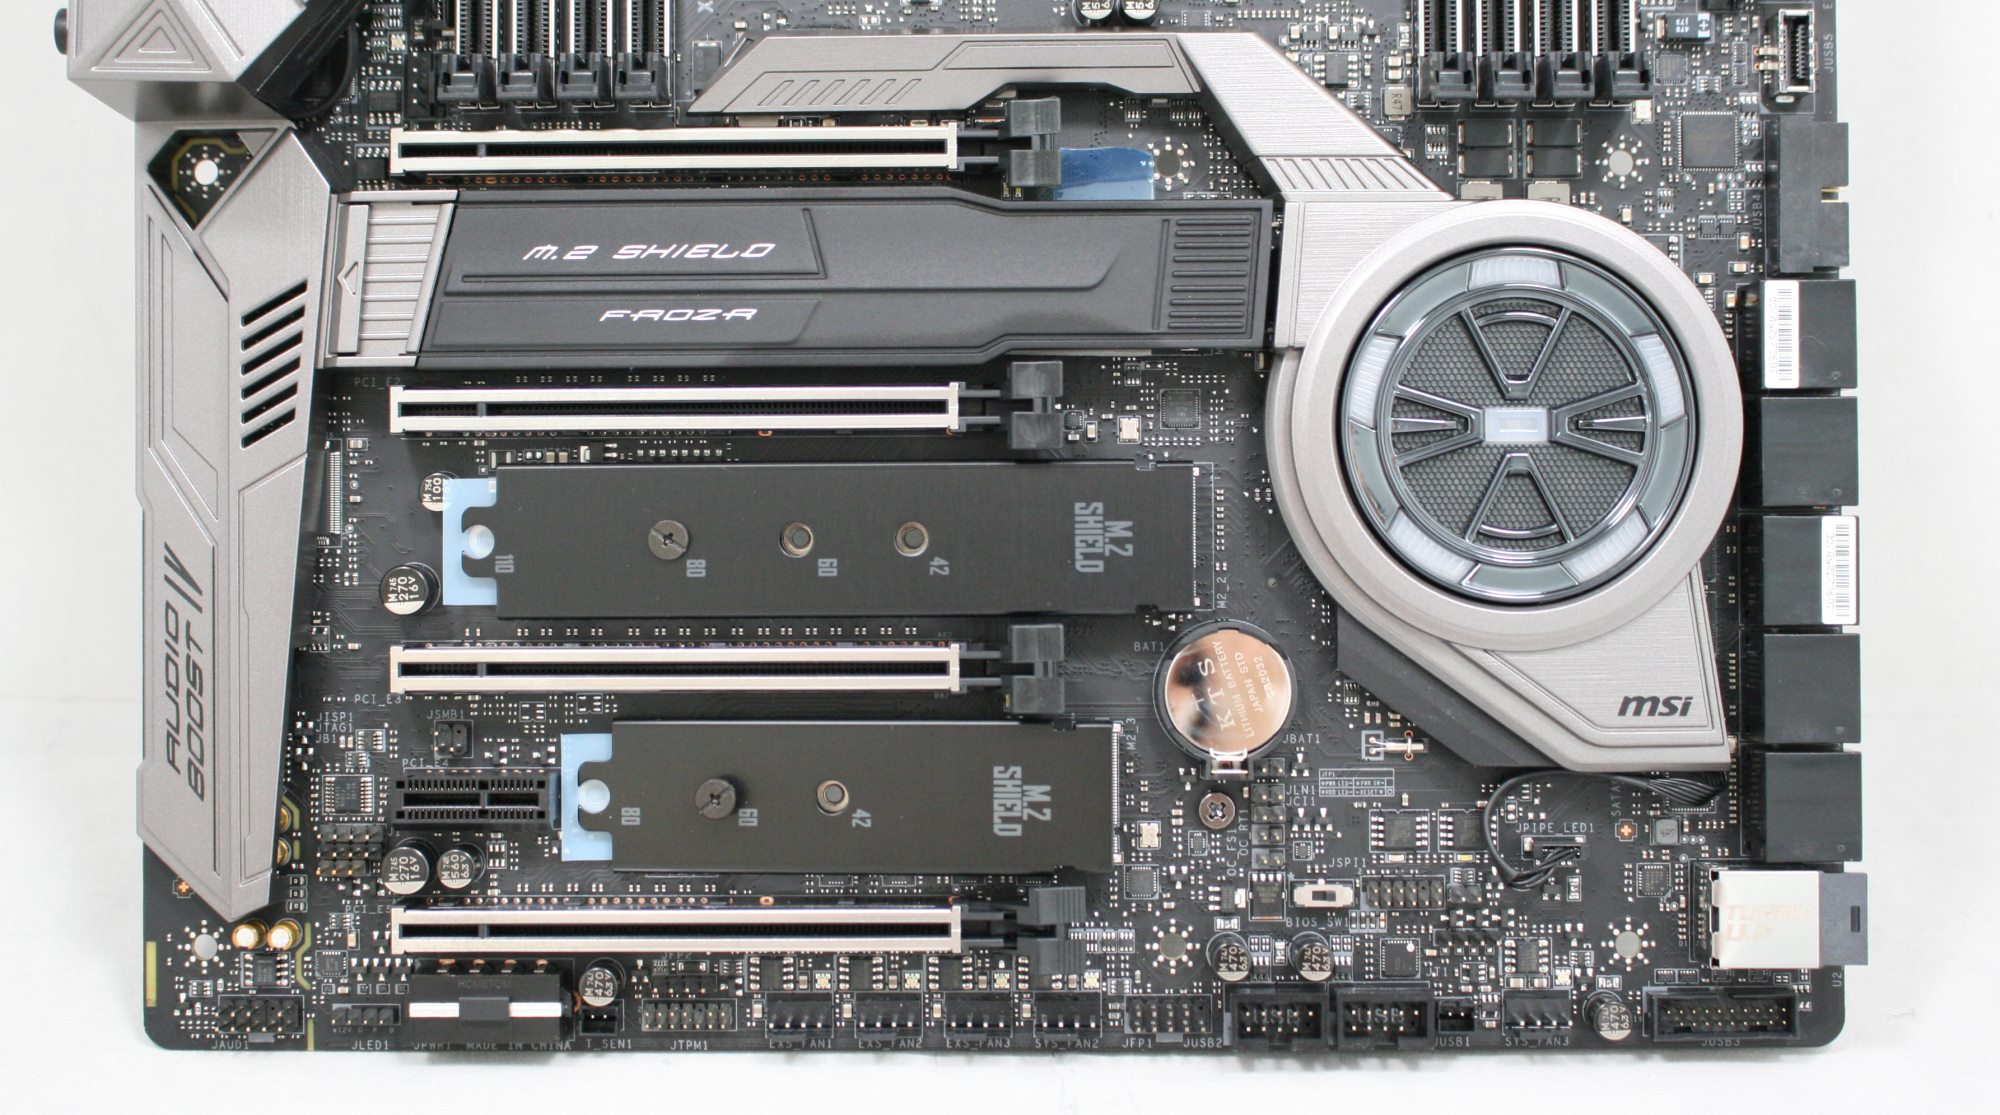
There are a total of five PCIe slots, four full-length and CPU connected, while the single PCIe 3.0 x1 slot is connected via the chipset.
Below is a simplified list of how the PCIe slots will work with each family of CPUs (talking PCIe lanes) when multiple cards are used (the "@" symbol is used to show slot preference for the configuration):
| MSI X299 XPower Gaming AC CPU PCIe Layout | |||||||||
| 44-Lane 1/2-Way |
44-Lane 3-Way |
44-Lane 4-Way |
28-Lane 1/2-Way |
28-Lane 3-Way |
16-Lane 1-Way |
||||
| PCIe 1 | @x16 | @x16 | @x8 | @x16 | @x8 | @x8 | |||
| PCIe 2 | - | - | @x8 | - | @x8 | - | |||
| PCIe 3 | @x16 | @x16 | @x16 | @x8 | @x8 | x4 | |||
| PCIe 5 | x8 | @x8 | @x8 | x4 | - | x4 | - | x4 | - |
| M.2_3 | x4 | x4 | x4 | - | x4 | - | x4 | - | x4 |
| SLI | Yes | Yes | Yes | Yes | Yes | No | |||
| Crossfire | Yes | Yes | Yes | Yes | Yes | No | |||
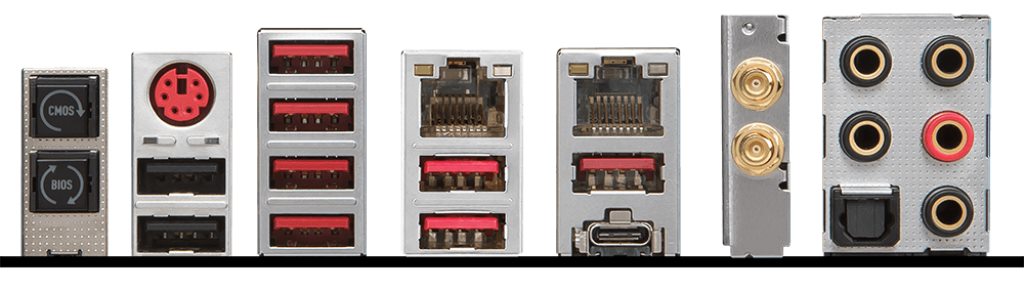
The back panel IO has the following connectors:
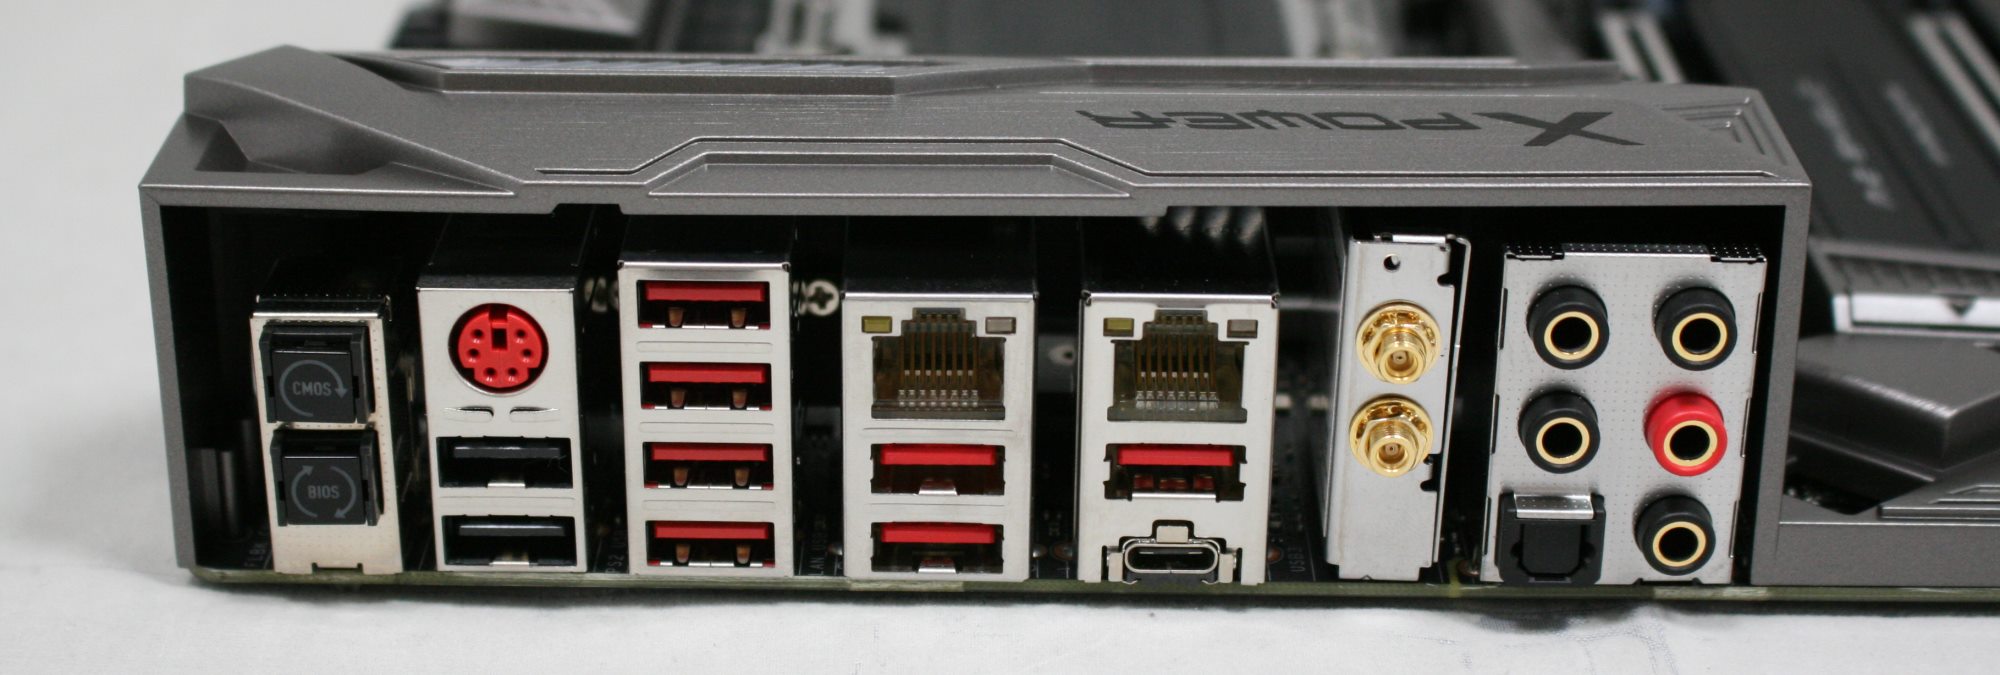
- 1 x Clear CMOS
- 1 x BIOS Flashback+ button
- 1 x PS/2 Keyboard/mouse combo port
- 2 x USB 2.0 ports
- 1 x BIOS FLASHBACK+ port
- 2 x Wi-Fi Antenna connectors
- 6 x USB 3.1 (5 Gbps) ports
- 2 x LAN (RJ45) ports
- 1 x USB 3.1 (10 Gbps) Type-A port
- 1 x USB 3.1 (10 Gbps) Type-C port
- 1 x Optical S/PDIF OUT connector
- 5 x OFC audio jacks
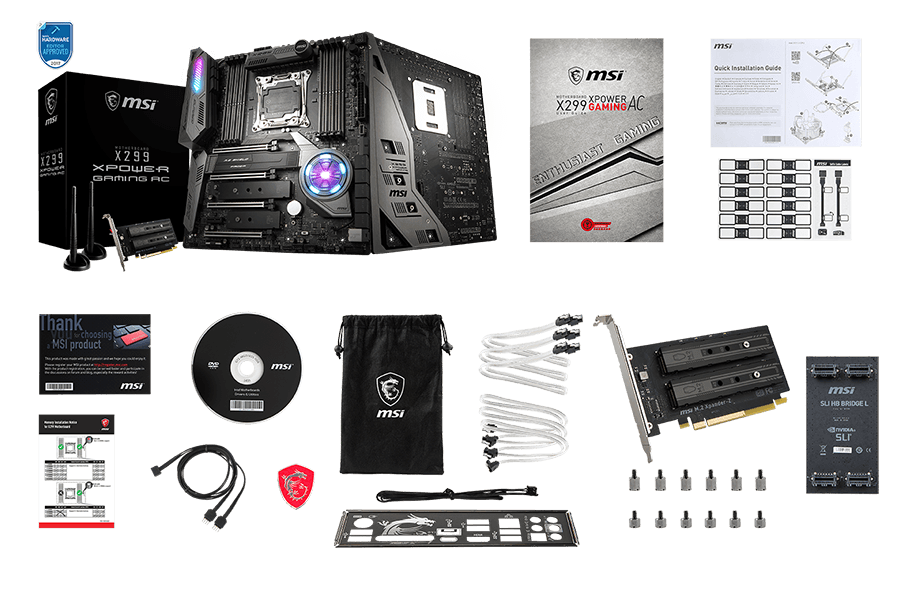
In the Box
The MSI X299 XPower Gaming AC includes the following accessories:
- Driver & Utilities Disk
- Motherboard User Guide
- 4 x SATA cables
- IO Shield
- SLI HB Bridge M
- 1 x 1 to 2 RGB LED Extension Y Cable (80cm)
- Quick Installation Guide, SATA Labels, Manual
- M.2 XPander-Z PCIe Riser Card
- Case badge
- 2 x Antenna


BIOS
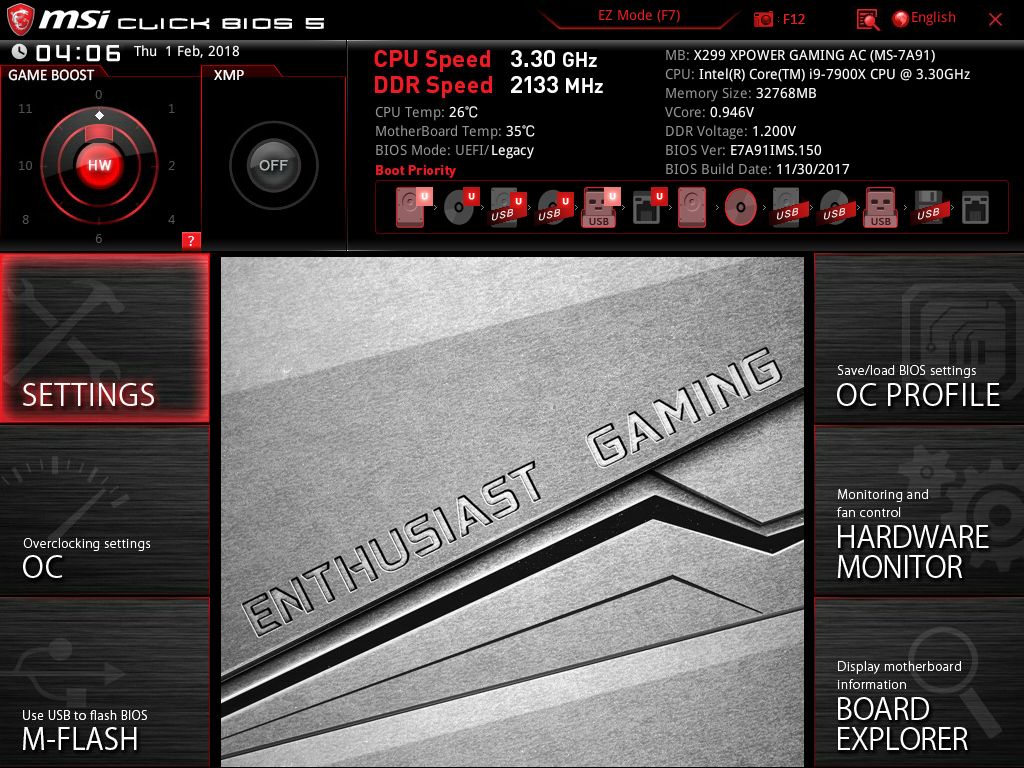
We've seen a few MSI BIOSes before, and the XPower Gaming AC's version is really no different than most others we have seen. By default, users are greeted with EZ BIOS as seen below. One thing I just picked up on is that the BIOS remembers what section you were in upon saving (advanced or EZ Mode), the next time entering the BIOS it should do so in the same mode.
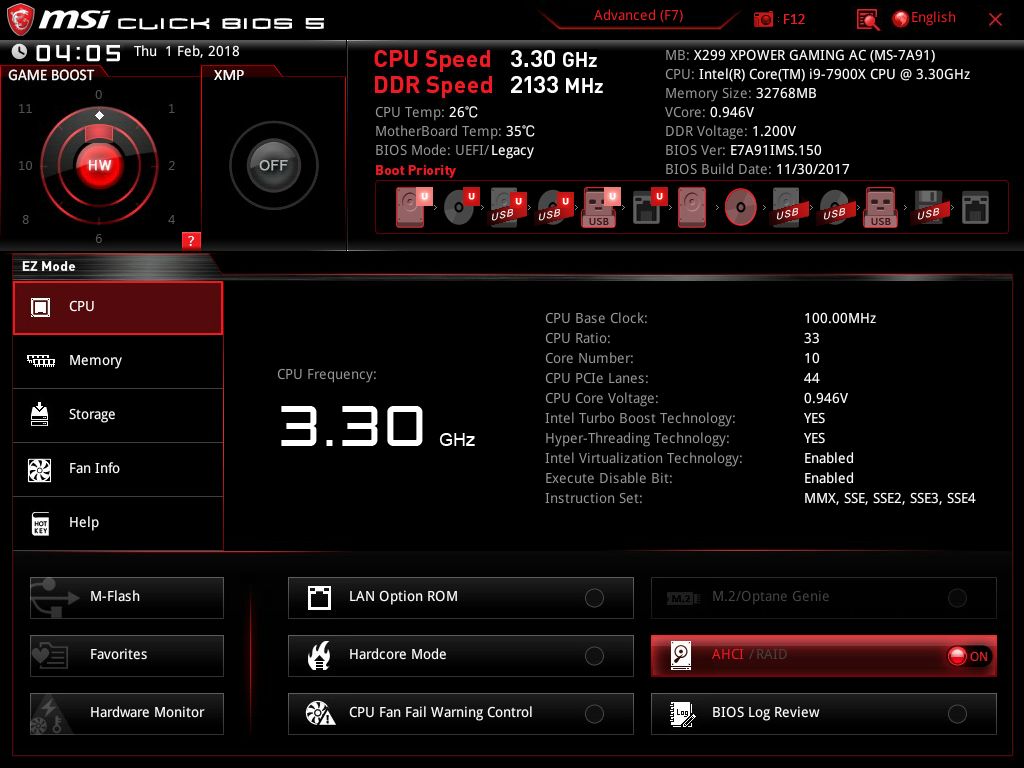
The EZ Mode version of the BIOS displays high-level system information on top such as CPU and DDR Speed and temperatures, BIOS version, XMP, and Game Boost status. Boot priority can be changed by dragging the icons below the system information around and placing them in the order the user would like.
The first screen is shown when entering advanced mode still has the same informational portion up top, but the bottom is now broken down into several sections, each with their own functions.
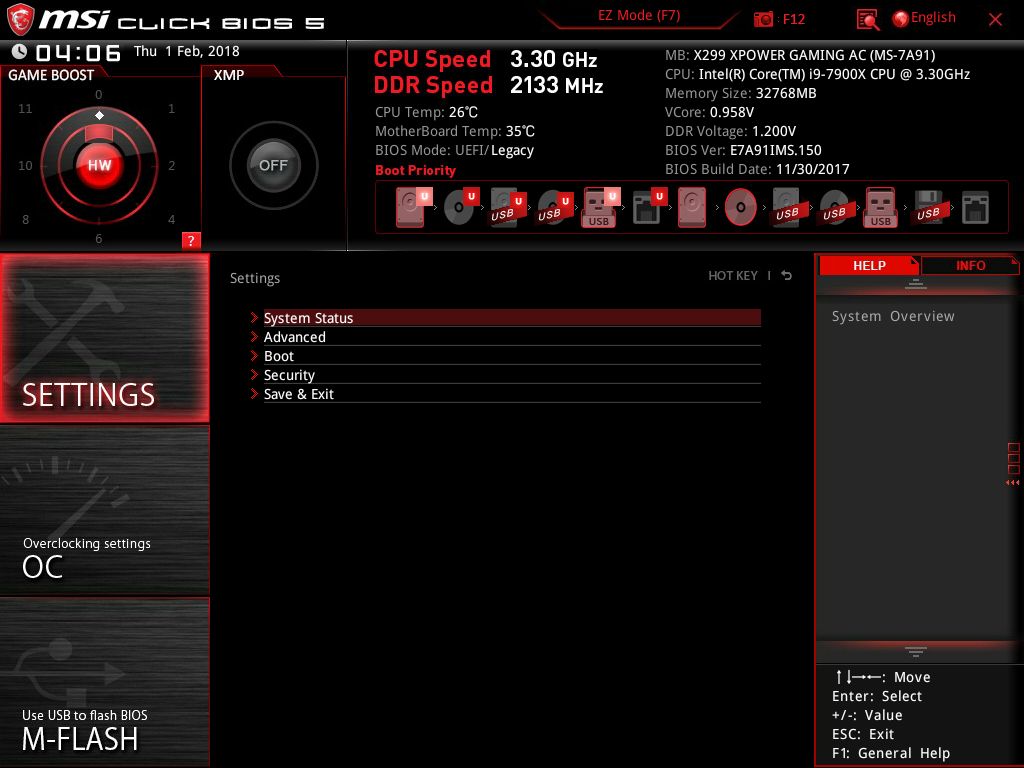
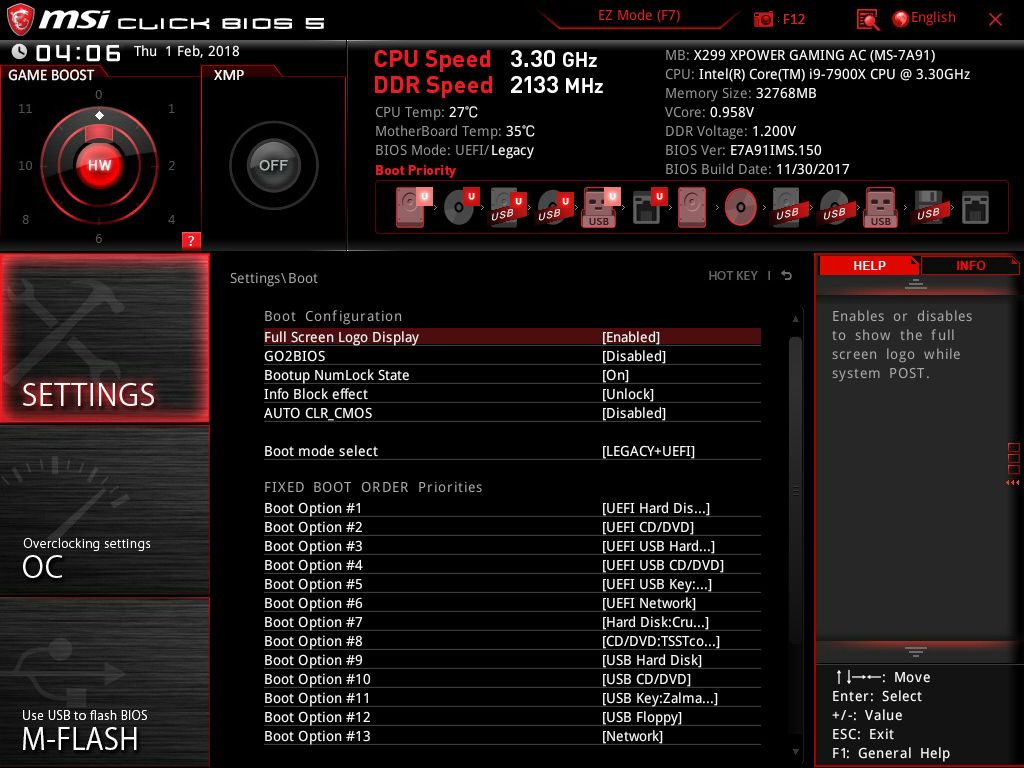
The Settings section has five options below it including System Status, Advanced, Boot, Security, and Save & Exit. Within the advanced section, users are able to control PCI Subsystem functions, VROC, USB and Peripheral configuration, Power Management details, and even gives the ability to Secure Erase a drive.

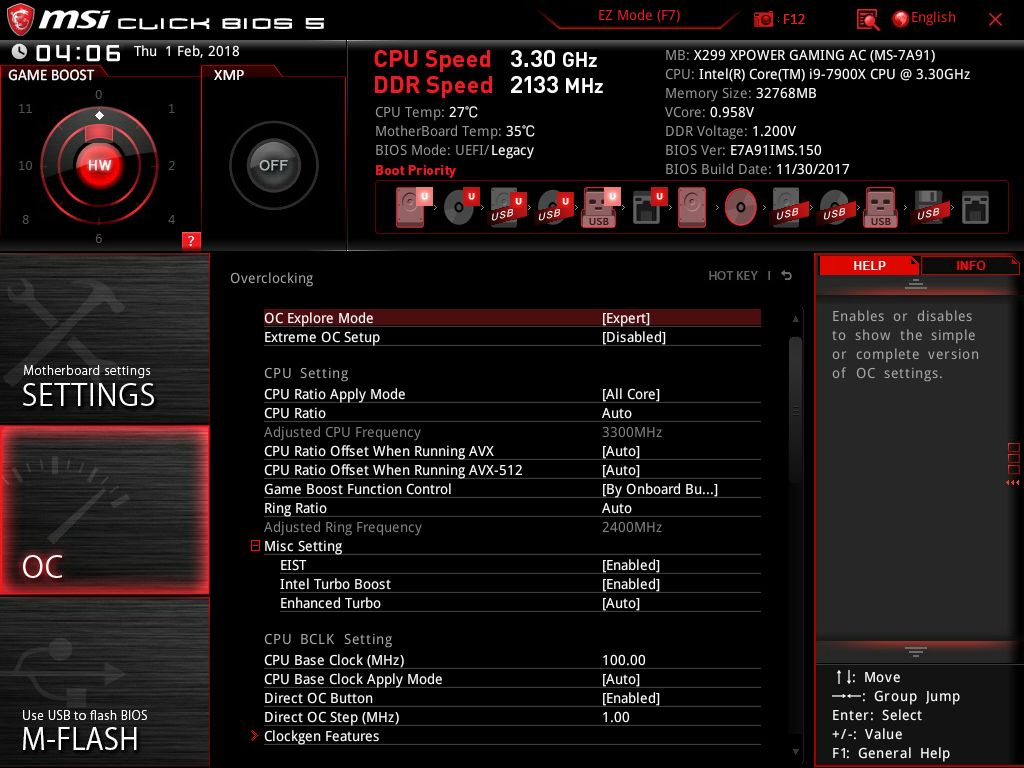
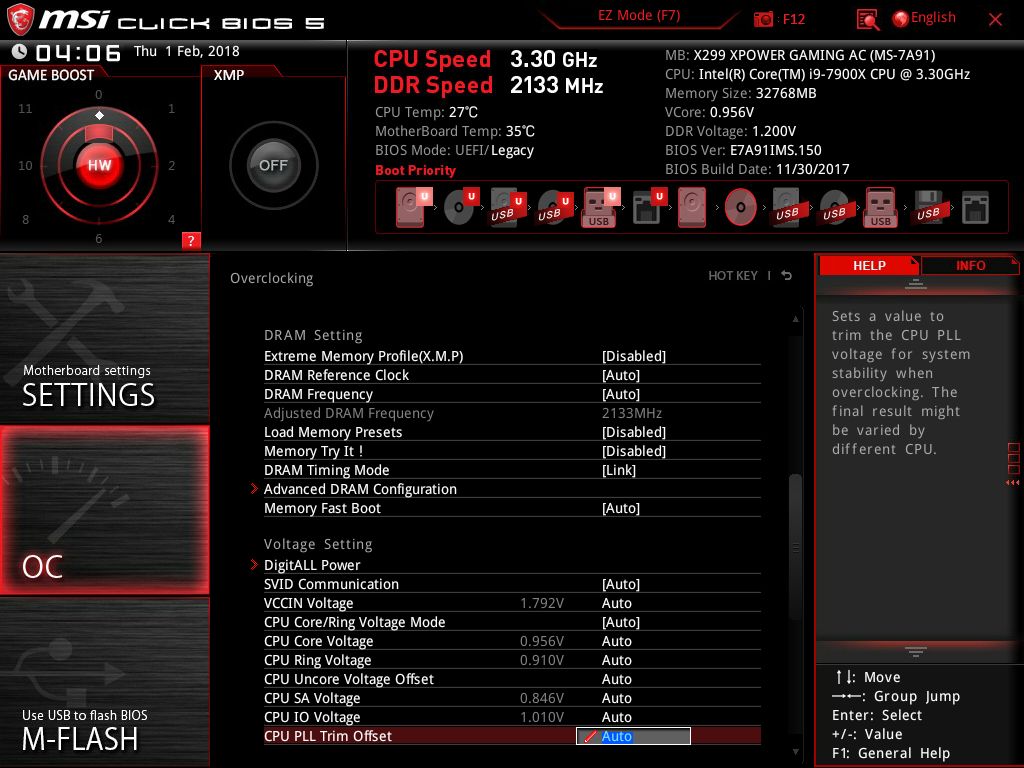
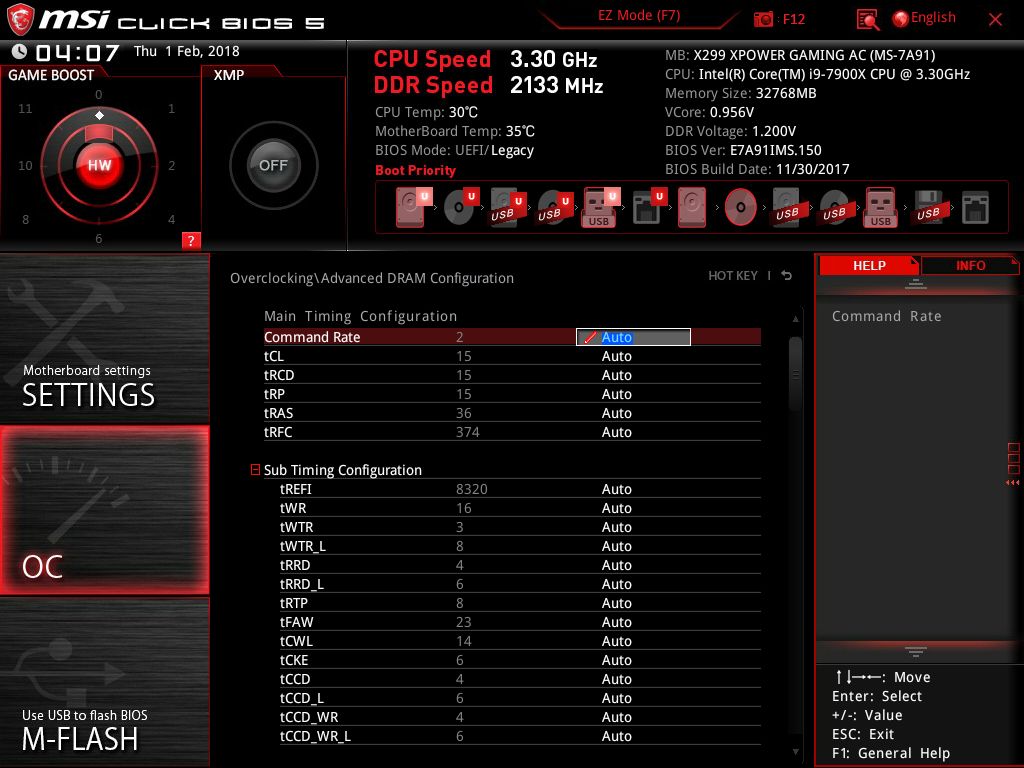
The OC section is where users are able to overclock the system. Like other Click BIOS 5 versions on different boards, there are two options here, Normal and Expert, where expert expands and adds more options for tinkering. Within this section, users will find options to change DRAM, Power settings on the CPU, and other functions related to overclocking.
The OC Profile section is where we are able to save as well as load BIOS profiles.

Options are to save/load them from the internal storage (ROM) or from a USB device. This comes in handy once a stable overclock is found users are able to revert right back to known good settings.

The Hardware Monitor section gives a graphical view of the system status. It displays current voltages of the system, temperatures across several read points on the board, as well as give fan speed status. On top of displaying fan speeds, users are also able to create custom fan profiles for each header.
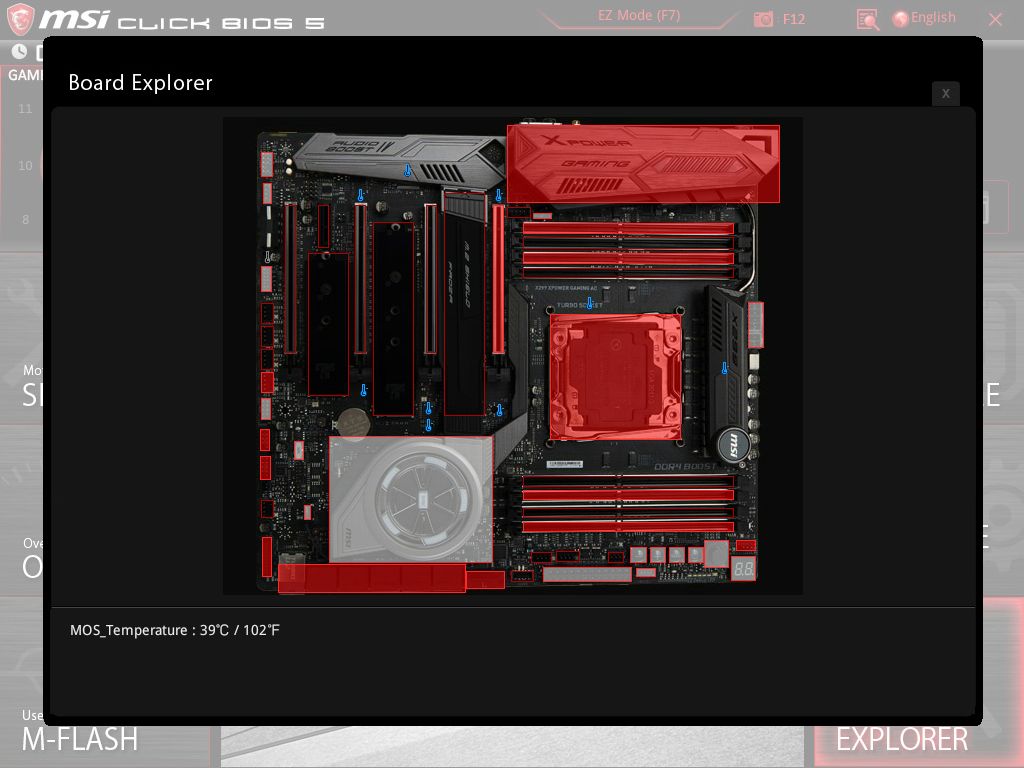
MSI's Board Explorer shows a top-down picture of the motherboard and shows what is plugged into the back panel IO, PCIe, DRAM slots, SATA and U.2 ports, the headers across the bottom, and even display temperatures of the nine sensors located strategically around the board. In this case, I have hovered the mouse over the MOSFET temperature sensor and it reads 39C.


Software
Our first piece of software will be the Driver Disk we received in the box. We can see the first screen contains basic drivers to get the motherboard setup and functioning properly including Intel Chipset, Network, Bluetooth, and Wi-Fi drivers.

It also includes third-party drivers for the Realtek audio and ASMedia SATA drivers. I was able to select the drivers I wanted and installed them without a hitch through the software. Just be aware the driver versions contained on the disk could be older than what the website has.

Speaking of driver versions, MSI's Live Update 6 application is used to keep up with the latest drivers. Upon boot, it will do a quick check of the drivers and compare that to the versions listed on the website. In this case, I capture the screenshot after I ran it so it does not show anything to be updated. This updated the drivers listed without issue.
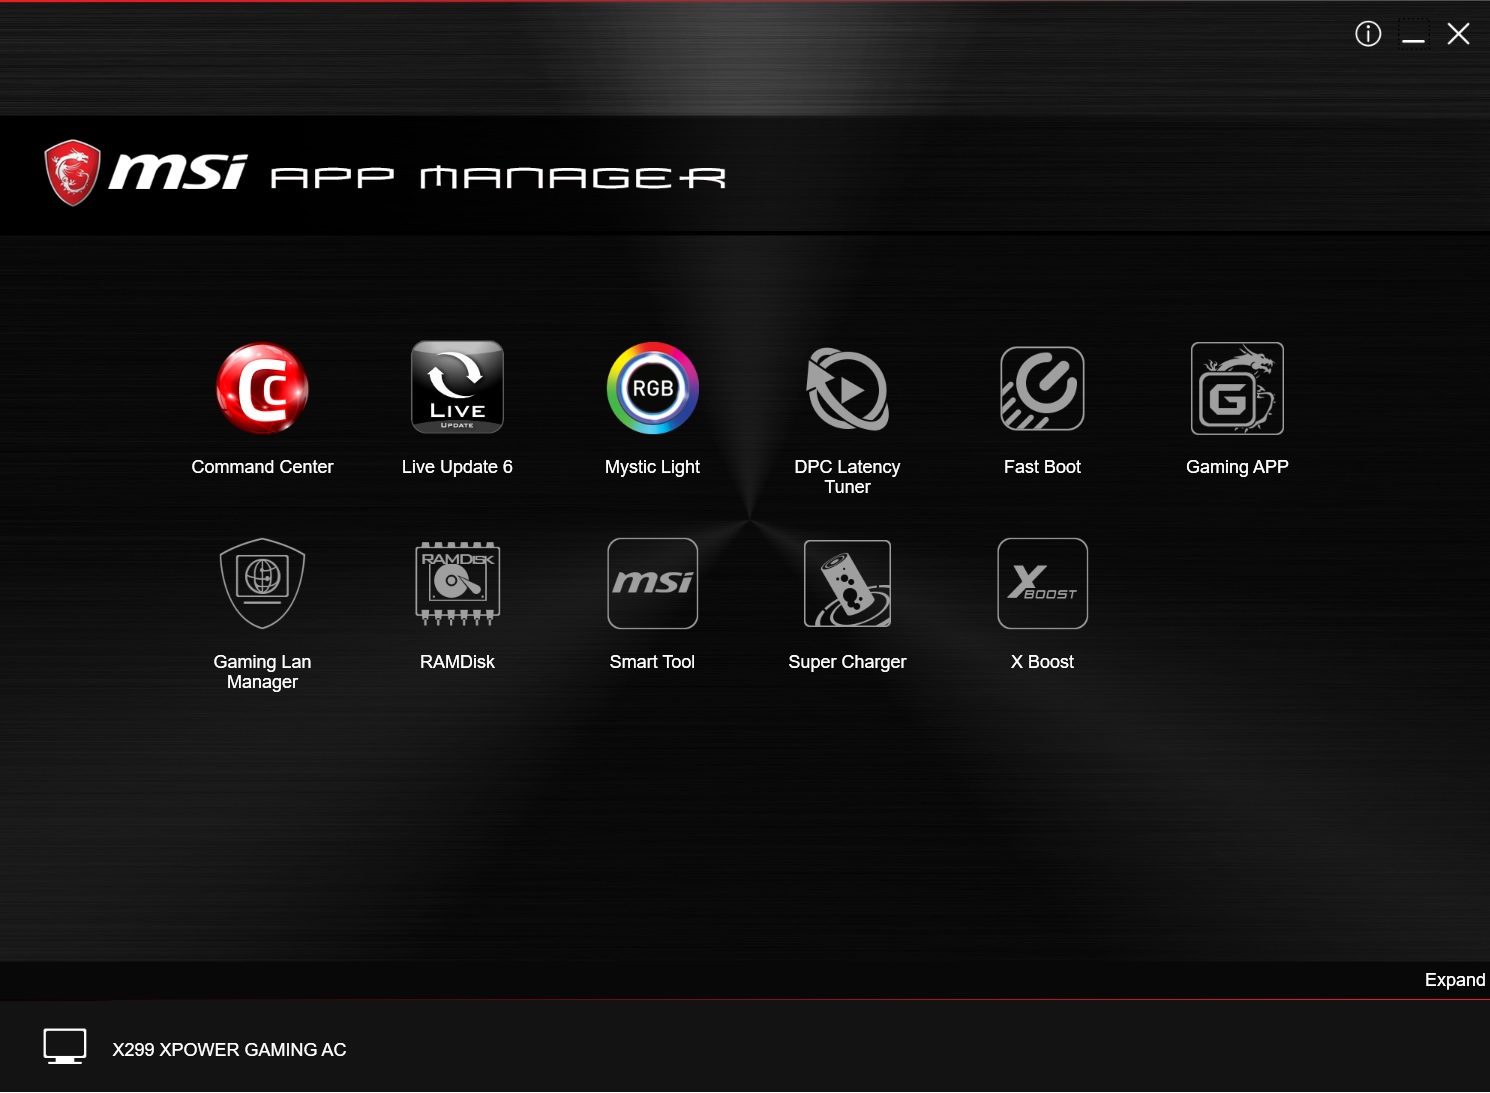
MSI's App Manager is an application which consolidates all MSI apps into one area for ease of access. If the application is installed the icon will appear in color, as above - if the app is not installed, the icon will be black and white. Users are also able to download any applications through the interface. Personally, I do not find these applications very useful as almost all of the apps have their own tray icon, so I can launch it from without the extra step of opening the App Manager.
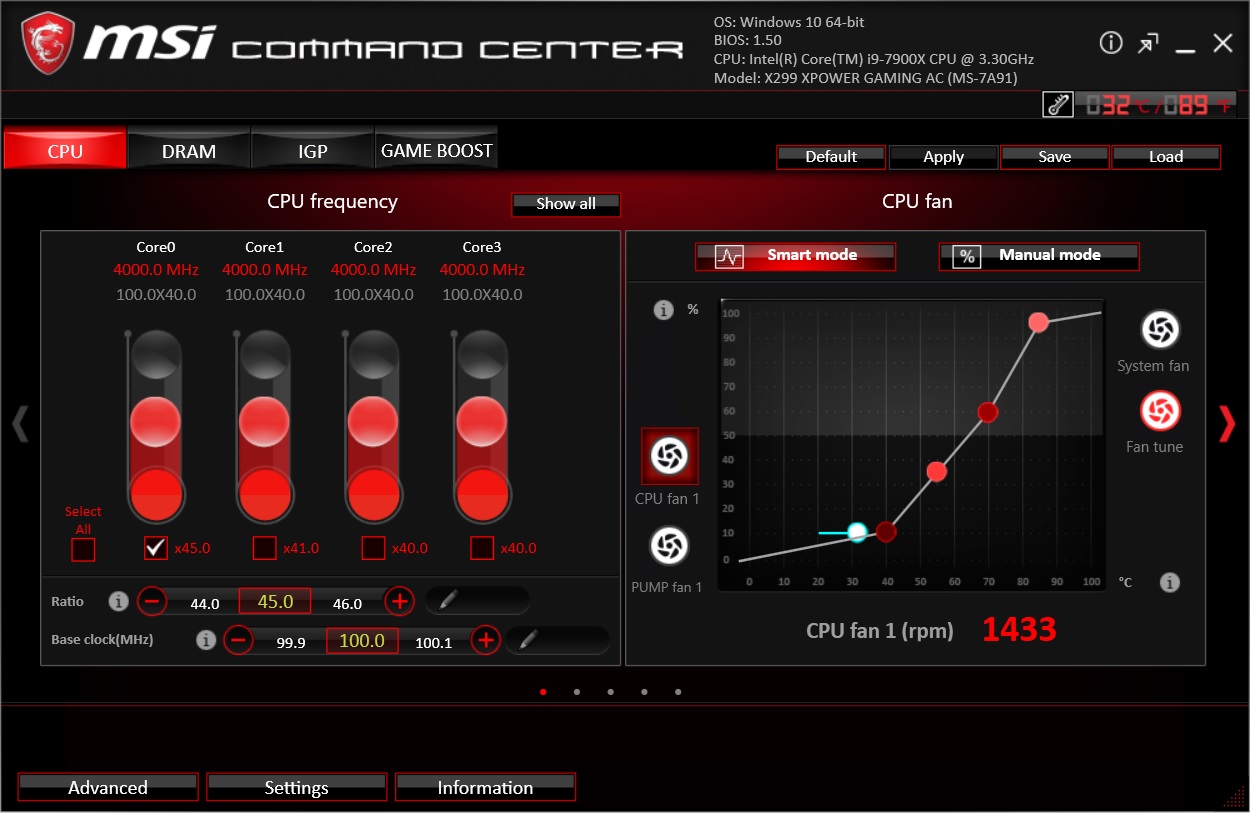
MSI's Command Center is a full function Windows-based application for both monitoring the system, overclocking, and a control center for fans. CC is one of the more thorough tools offering users the ability to adjust their fan speeds and create custom curves, as well as overclock and CPU voltage, BCLK, CPU ratio adjustments, even DRAM timings. I used this tool when I overclocking from 4 GHz to 4.5 GHz in our overclock testing so I wouldn't have to reboot into the BIOS each time I needed a change. The application worked without issue with the things I tried.
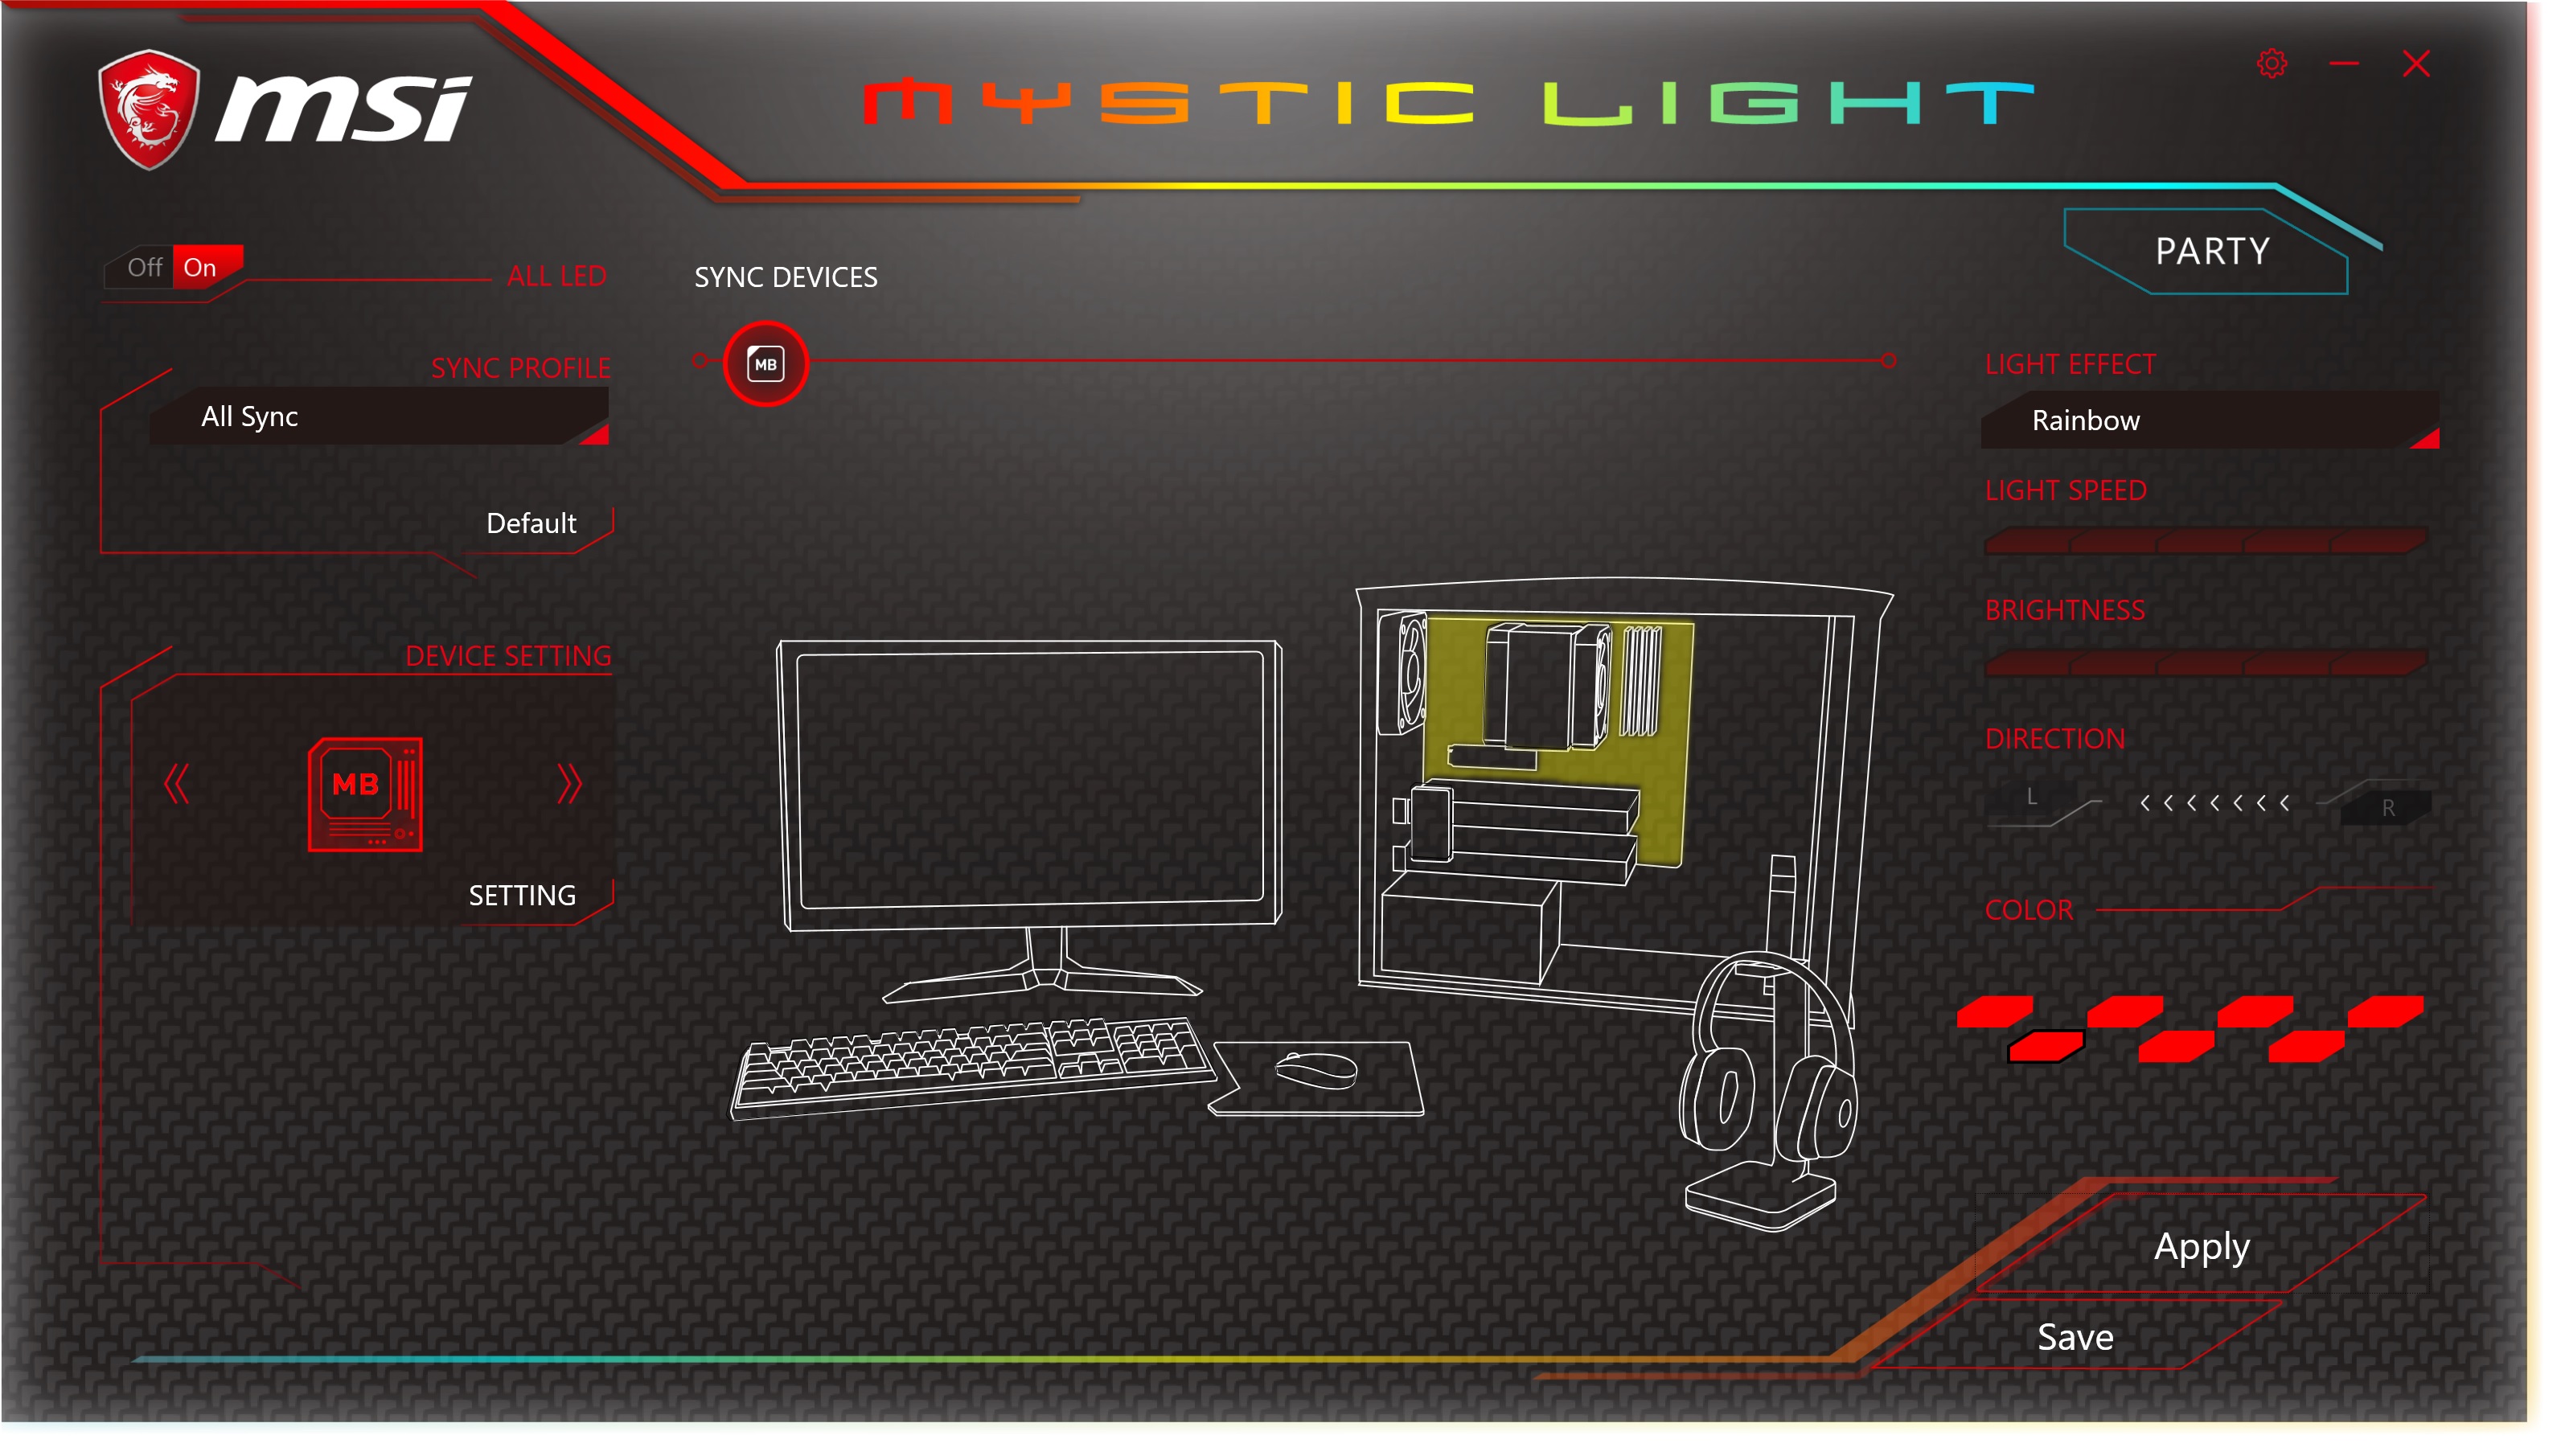
MSI's Mystic Light app is able to control the two sets of RGB LEDs on the XPower Gaming AC without issue. It will also control RGB LEDs when attached to the onboard header. There are several different lighting effects to choose from as well as light speed, brightness, and the direction of the effect. My only complaint about this software is the lack of scaling. When I opened this on the 4K monitor I use to test with, it took up nearly the entire screen. Outside of that, it worked like a charm on the integrated RGB LEDs.
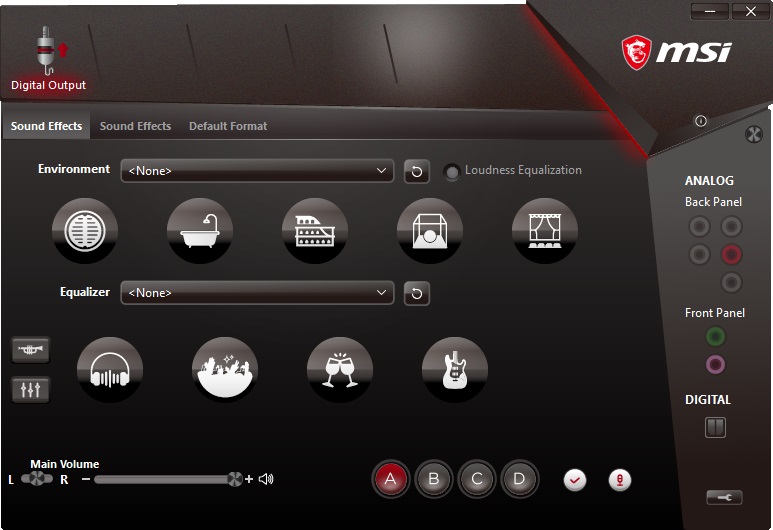
The X299 XPower Gaming AC uses the latest Realtek premium audio codec, the ALC1220. With this comes its own application to change the sound to your liking from its predefined sound stages to a graphic equalizer, there are plenty of options to manipulate the sound here. On this board, it uses a MSI skin to match more cleanly with the red/black enthusiast line it is part of.
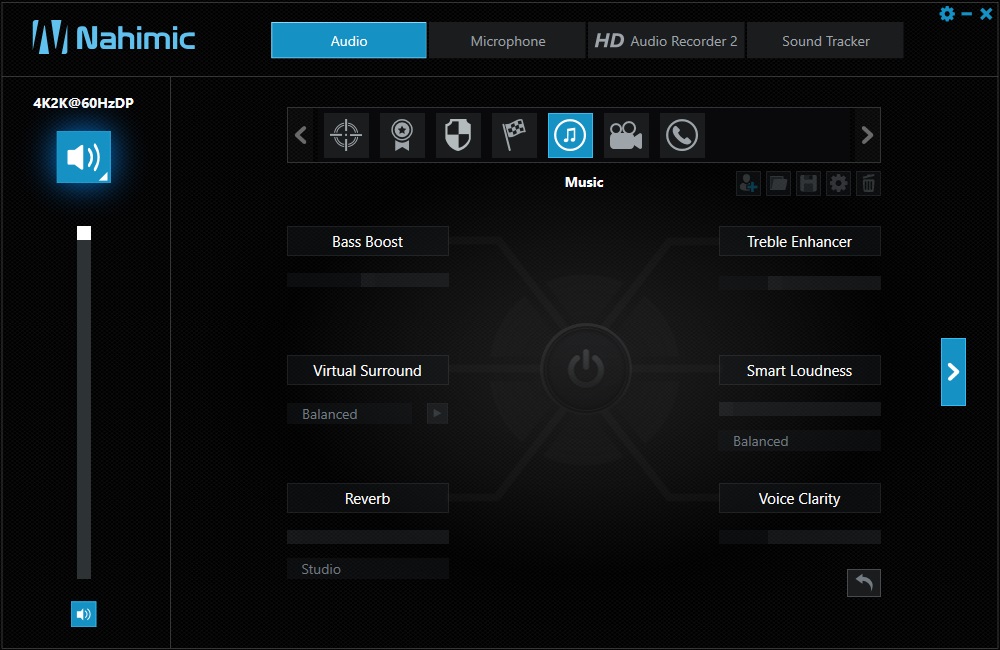
MSI takes audio a step further and includes the Nahimic software package on top of the Realtek application. Here we are able to adjust more options and do so for each type of application be it gaming, movies, music, or a phone call.


Board Features
The MSI XPower Gaming AC is MSI's flagship motherboard on the X299 platform. The XPower Gaming AC received a more robust power delivery area using premium Infineon power components. MSI mates this with a dual heat sink to keep the VRM within comfortable operating parameters under load, even with a 165W CPU which is an improvement over their early boards with smaller heatsinks and not as efficient heatsinks.
| MSI X299 XPower Gaming AC | |
| Warranty Period | 3 Years |
| Product Page | Link |
| Price | $440 (Amazon) |
| Size | ATX |
| CPU Interface | LGA2066 |
| Chipset | Intel X299 |
| Memory Slots (DDR4) | Eight DDR4 Quad Channel Supporting 128GB Up to DDR4-4133 (Skylake-X) Up to DDR4-4500 (Kaby Lake-X) |
| Network Connectivity / Wi-Fi | 1 x Intel I219-V GbE 1 x Intel I211 GbE Intel Dual Band Wireless-AC 8265 802.11a/b/g/n/ac, up to 867 Mbps Bluetooth 4.2 |
| Onboard Audio | Realtek ALC1220 |
| PCIe Slots for Graphics (from CPU) | 4 x PCIe 3.0 - 44 Lane CPU: x16/x0/x16/x8 or x8/x8/x16/x8 - 28 Lane CPU: x16/x0/x8/x4 or x8/x8/x8/x4 - 16 Lane CPU: x8/x0/x4/x4 |
| PCIe Slots (from PCH) | 1 x PCIe 3.0 x1 |
| Onboard SATA | 10 x RAID 0/1/5/10 |
| Onboard SATA Express | None |
| Onboard M.2 | 2 x PCIe 3.0 x4 and SATA (chipset) 1 x PCIe 3.0 x4 (CPU) |
| Onboard U.2 | 1 x PCIe 3.0 x4 (chipset) |
| USB 3.1 | ASMedia ASM3142 1 x Type-A Port (back panel) 2 x Type-C (back panel and internal header) |
| USB 3.0 | 6 x Back Panel (ASM1074) 2 x Headers (Chipset) |
| USB 2.0 | 2 x Back Panel 2 x Headers |
| Power Connectors | 1 x 24-pin ATX 1 x 8-pin CPU 1 x 4-pin CPU (optional) |
| Fan Headers | 1 x 4-pin CPU 1 x 4-pin Water Pump 4 x 4-pin System Fans 4 x 4-pin Extend Fans |
| IO Panel | 1 x Clear CMOS 1 x BIOS Flashback+ button 1 x PS/2 Keyboard/mouse combo port 2 x USB 2.0 ports 1 x BIOS Flashback port 2 x Wi-Fi Antenna connectors 6 x USB 3.1 (5 Gbps) ports 2 x LAN (RJ45) ports 1 x USB 3.1 (10 Gbps) Type-A port 1 x USB 3.1 (10 Gbps) Type-C port 1 x Optical S/PDIF OUT connector 5 x OFC audio jacks |
Out of the box, the board is able to run a total of five M.2 drives - three onboard and two with using the M.2 Xpander-Z add-in card. This is the most out of the box we have seen so far. Unique to this board is a larger M.2 heatsink for the top slot that blends in nicely with the chipset heatsink.
RGB implementation is minimal, but enough to give the system a personal touch. To that end, the board also offers 3D Printer support to modify custom print and modify the board. MSI chose to pass on the Killer network parts that we saw on the M7 ACK and instead is using Intel parts all around in the form of two wired GbE ports and Dual Band Wireless. Last, MSI utilizes the premium Realtek ALC1220 codec for audio.
Test Bed
As per our testing policy, we take a high-end CPU suitable for the motherboard that was released during the socket’s initial launch and equip the system with a suitable amount of memory running at the processor maximum supported frequency. This is also typically run at JEDEC sub timings where possible. It is noted that some users are not keen on this policy, stating that sometimes the maximum supported frequency is quite low, or faster memory is available at a similar price, or that the JEDEC speeds can be prohibitive for performance. While these comments make sense, ultimately very few users apply memory profiles (either XMP or other) as they require interaction with the BIOS, and most users will fall back on JEDEC supported speeds - this includes home users as well as industry who might want to shave off a cent or two from the cost or stay within the margins set by the manufacturer. Where possible, we will extend our testing to include faster memory modules either at the same time as the review or a later date.
Readers of our motherboard review section will have noted the trend in modern motherboards to implement a form of MultiCore Enhancement / Acceleration / Turbo (read our report here) on their motherboards. This does several things, including better benchmark results at stock settings (not entirely needed if overclocking is an end-user goal) at the expense of heat and temperature. It also gives, in essence, an automatic overclock which may be against what the user wants. Our testing methodology is ‘out-of-the-box’, with the latest public BIOS installed and XMP enabled, and thus subject to the whims of this feature. It is ultimately up to the motherboard manufacturer to take this risk – and manufacturers taking risks in the setup is something they do on every product (think C-state settings, USB priority, DPC Latency/monitoring priority, overriding memory sub-timings at JEDEC). Processor speed change is part of that risk, and ultimately if no overclocking is planned, some motherboards will affect how fast that shiny new processor goes and can be an important factor in the system build.
| Test Setup | |
| Processor | Intel i9 7900X (10C/20T, 3.3G, 140W) |
| Motherboard | MSI X299 XPower Gaming AC (BIOS v1.50) |
| Cooling | Corsair H115i |
| Power Supply | Corsair HX750 |
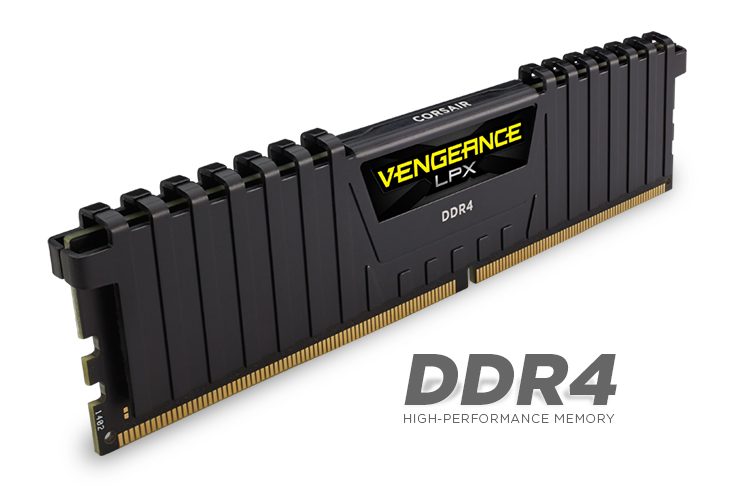
| Memory | Corsair Vengeance LPX 4x8GB DDR4 2666 CL16 Corsair Vengeance 4x4GB DDR4 3200 CL16 |
| Memory Settings | DDR4 2666 CL16-18-18-35 2T |
| Video Cards | ASUS Strix GTX 980 |
| Hard Drive | Crucial MX300 1TB |
| Optical Drive | TSST TS-H653G |
| Case | Open Test Bed |
| Operating System | Windows 10 Pro 64-bit |
Many thanks to...
We must thank the following companies for kindly providing hardware for our multiple test beds. Some of this hardware is not in this testbed specifically but is used in other testing.
Thank you to ASUS for providing us with GTX 980 Strix GPUs. At the time of release, the STRIX brand from ASUS was aimed at silent running, or to use the marketing term: '0dB Silent Gaming'. This enables the card to disable the fans when the GPU is dealing with low loads well within temperature specifications. These cards equip the GTX 980 silicon with ASUS' Direct CU II cooler and 10-phase digital VRMs, aimed at high-efficiency conversion. Along with the card, ASUS bundles GPU Tweak software for overclocking and streaming assistance.
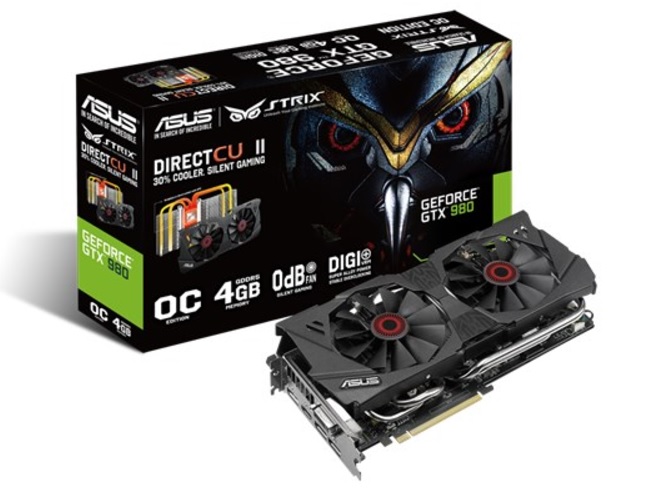
The GTX 980 uses NVIDIA's GM204 silicon die, built upon their Maxwell architecture. This die is 5.2 billion transistors for a die size of 298 mm2, built on TMSC's 28nm process. A GTX 980 uses the full GM204 core, with 2048 CUDA Cores and 64 ROPs with a 256-bit memory bus to GDDR5. The official power rating for the GTX 980 is 165W.
The ASUS GTX 980 Strix 4GB (or the full name of STRIX-GTX980-DC2OC-4GD5) runs a reasonable overclock over a reference GTX 980 card, with frequencies in the range of 1178-1279 MHz. The memory runs at stock, in this case, 7010 MHz. Video outputs include three DisplayPort connectors, one HDMI 2.0 connector, and a DVI-I.
Further Reading: AnandTech's NVIDIA GTX 980 Review
Thank you to Crucial for providing us with MX300 SSDs. Crucial stepped up to the plate as our benchmark list grows larger with newer benchmarks and titles, and the 1TB MX300 units are strong performers. Based on Marvell's 88SS1074 controller and using Micron's 384Gbit 32-layer 3D TLC NAND, these are 7mm high, 2.5-inch drives rated for 92K random read IOPS and 530/510 MB/s sequential read and write speeds.

The 1TB models we are using here support TCG Opal 2.0 and IEEE-1667 (eDrive) encryption and have a 360TB rated endurance with a three-year warranty.
Further Reading: AnandTech's Crucial MX300 (750 GB) Review
Thank you to Corsair for providing us with Vengeance LPX DDR4 Memory, HX750 Power Supply, and H115i CPU Cooler.
Corsair kindly sent a 4x8GB DDR4 2666 set of their Vengeance LPX low profile, high-performance memory for our stock testing. The heatsink is made of pure aluminum to help remove heat from the sticks and has an eight-layer PCB. The heatsink is a low profile design to help fit in spaces where there may not be room for a tall heat spreader; think a SFF case or using a large heatsink. Timings on this specific set come in at 16-18-18-35. The Vengeance LPX line supports XMP 2.0 profiles for easily setting the speed and timings. It also comes with a limited lifetime warranty.
Powering the test system is Corsair's HX750 Power Supply. This HX750 is a dual mode unit able to switch from a single 12V rail (62.5A/750W) to a five rail CPU (40A max ea.) and is also fully modular. It has a typical selection of connectors, including dual EPS 4+4 pin four PCIe connectors and a whopping 16 SATA power leads, as well as four 4-pin Molex connectors.

The 135mm fluid dynamic bearing fan remains off until it is 40% loaded offering complete silence in light workloads. The HX750 comes with a ten-year warranty.
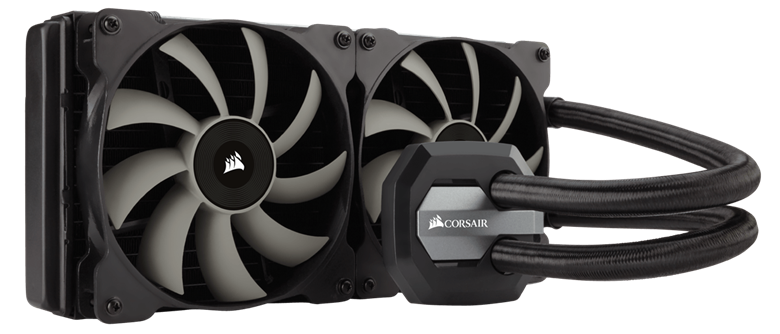
In order to cool these high-TDP HEDT CPUs, Corsair sent over its latest and largest AIO in the H115i. This closed-loop system uses a 280mm radiator with 2x140mm SP140L PWM controlled fans. The pump/block combination mounts to all modern CPU sockets. Users are also able to integrate this cooler into the Corsair link software via USB for more control and options.
Benchmark Overview
For our testing, depending on the product, we attempt to tailor the presentation of our global benchmark suite down into what users who would buy this hardware might actually want to run. For CPUs, our full test suite is typically used to gather data and all the results are placed into Bench, our benchmark database for users that want to look at non-typical benchmarks or legacy data. For motherboards, we run our short form CPU tests, the gaming tests with half the GPUs of our processor suite, and our system benchmark tests which focus on non-typical and non-obvious performance metrics that are the focal point for specific groups of users.
The benchmarks fall into several areas:
Short Form CPU
Our short form testing script uses a straight run through of a mixture of known apps or workloads and requires about four hours. These are typically the CPU tests we run in our motherboard suite, to identify any performance anomalies.
| CPU Short Form Benchmarks | |
| Three Dimensional Particle Movement v2.1 (3DPM) | 3DPM is a self-penned benchmark, derived from my academic research years looking at particle movement parallelism. The coding for this tool was rough, but emulates the real world in being non-CompSci trained code for a scientific endeavor. The code is unoptimized, but the test uses OpenMP to move particles around a field using one of six 3D movement algorithms in turn, each of which is found in the academic literature. |
| The second version of this benchmark is similar to the first, however it has been re-written in VS2012 with one major difference: the code has been written to address the issue of false sharing. If data required by multiple threads, say four, is in the same cache line, the software cannot read the cache line once and split the data to each thread - instead it will read four times in a serial fashion. The new software splits the data to new cache lines so reads can be parallelized and stalls minimized. | |
| WinRAR 5.4 | WinRAR is a compression based software to reduce file size at the expense of CPU cycles. We use the version that has been a stable part of our benchmark database through 2015, and run the default settings on a 1.52GB directory containing over 2800 files representing a small website with around thirty half-minute videos. We take the average of several runs in this instance. |
| POV-Ray 3.7.1 b4 | POV-Ray is a common ray-tracing tool used to generate realistic looking scenes. We've used POV-Ray in its various guises over the years as a good benchmark for performance, as well as a tool on the march to ray-tracing limited immersive environments. We use the built-in multi threaded benchmark. |
| HandBrake v1.0.2 | HandBrake is a freeware video conversion tool. We use the tool in to process two different videos into x264 in an MP4 container - first a 'low quality' two-hour video at 640x388 resolution to x264, then a 'high quality' ten-minute video at 4320x3840, and finally the second video again but into HEVC. The low-quality video scales at lower performance hardware, whereas the buffers required for high-quality tests can stretch even the biggest processors. At current, this is a CPU only test. |
| 7-Zip 9.2 | 7-Zip is a freeware compression/decompression tool that is widely deployed across the world. We run the included benchmark tool using a 50MB library and take the average of a set of fixed-time results. |
| DigiCortex v1.20 | The newest benchmark in our suite is DigiCortex, a simulation of biologically plausible neural network circuits, and simulates activity of neurons and synapses. DigiCortex relies heavily on a mix of DRAM speed and computational throughput, indicating that systems which apply memory profiles properly should benefit and those that play fast and loose with overclocking settings might get some extra speed up. |
System Benchmarks
Our system benchmarks are designed to probe motherboard controller performance, particularly any additional USB controllers or the audio controller. As general platform tests we have DPC Latency measurements and system boot time, which can be difficult to optimize for on the board design and manufacturing level.
| System Benchmarks | |
| Power Consumption | One of the primary differences between different motherboads is power consumption. Aside from the base defaults that every motherboard needs, things like power delivery, controller choice, routing and firmware can all contribute to how much power a system can draw. This increases for features such as PLX chips and multi-gigabit ethernet. |
| Non-UEFI POST Time | The POST sequence of the motherboard becomes before loading the OS, and involves pre-testing of onboard controllers, the CPU, the DRAM and everything else to ensure base stability. The number of controllers, as well as firmware optimizations, affect the POST time a lot. We test the BIOS defaults as well as attempt a stripped POST. |
| Rightmark Audio Analyzer 6.2.5 | Testing onboard audio is difficult, especially with the numerous amount of post-processing packages now being bundled with hardware. Nonetheless, manufacturers put time and effort into offering a 'cleaner' sound that is loud and of a high quality. RMAA, with version 6.2.5 (newer versions have issues), under the right settings can be used to test the signal-to-noise ratio, signal crossover, and harmonic distortion with noise. |
| USB Backup | USB ports can come from a variety of sources: chipsets, controllers or hubs. More often than not, the design of the traces can lead to direct impacts on USB performance as well as firmware level choices relating to signal integrity on the motherboard. |
| DPC Latency | Another element is deferred procedure call latency, or the ability to handle interrupt servicing. Depending on the motherboard firmware and controller selection, some motherboards handle these interrupts quicker than others. A poor result could lead to delays in performance, or for example with audio, a delayed request can manifest in distinct audible pauses, pops or clicks. |
Gaming
Our gaming benchmarks are designed to show any differences in performance when playing games.
System Performance
Not all motherboards are created equal. On the face of it, they should all perform the same and differ only in the functionality they provide - however, this is not the case. The obvious pointers are power consumption, but also the ability for the manufacturer to optimize USB speed, audio quality (based on audio codec), POST time and latency. This can come down to manufacturing process and prowess, so these are tested.
Power Consumption
Power consumption was tested on the system while in a single GPU configuration with a wall meter connected to the Corsair HX 750 power supply. This power supply is Platinum rated. As I am in the US on a 120 V supply, leads to ~87% efficiency > 75W, and 92%+ efficiency at 375W, suitable for both idle and multi-GPU loading. This method of power reading allows us to compare the power management of the UEFI and the board to supply components with power under load, and includes typical PSU losses due to efficiency. These are the real world values that consumers may expect from a typical system (minus the monitor) using this motherboard.
While this method for power measurement may not be ideal, and you feel these numbers are not representative due to the high wattage power supply being used (we use the same PSU to remain consistent over a series of reviews, and the fact that some boards on our test bed get tested with three or four high powered GPUs), the important point to take away is the relationship between the numbers. These boards are all under the same conditions, and thus the differences between them should be easy to spot.
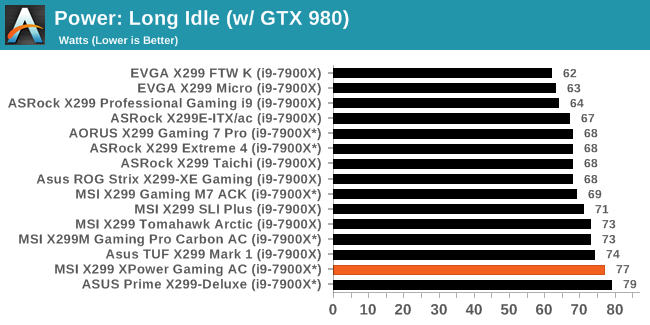
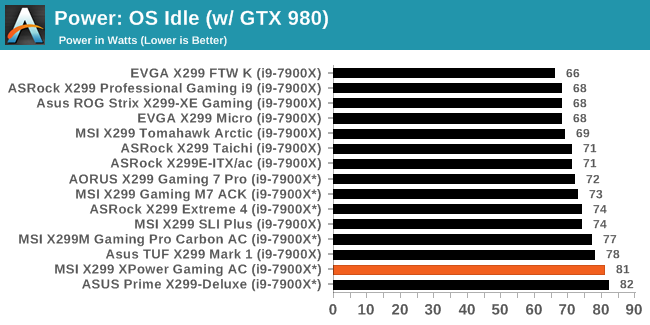
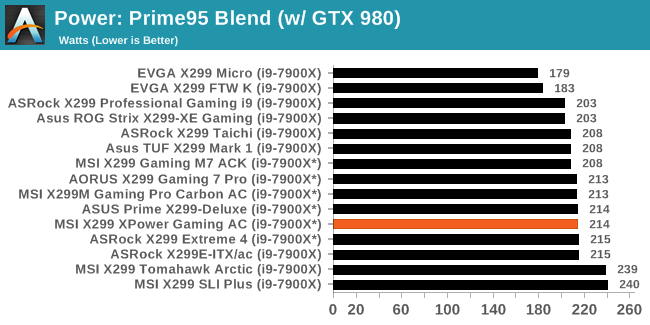
The power consumption tests for the MSI X299 XPower Gaming AC show it using a little more power than most of the boards we have tested so far idling at 81W in Windows and 77W while idle. The lions share of results are in the upper 60s to low 70s for long idle and lower 70s for the OS idle. The load results brought things back to about average at 214W, about the same as five other boards. Overall, power use was a bit higher on this board.
Non-UEFI POST Time
Different motherboards have different POST sequences before an operating system is initialized. A lot of this is dependent on the board itself, and POST boot time is determined by the controllers on board (and the sequence of how those extras are organized). As part of our testing, we look at the POST Boot Time using a stopwatch. This is the time from pressing the ON button on the computer to when Windows 10 starts loading. (We discount Windows loading as it is highly variable given Windows specific features.
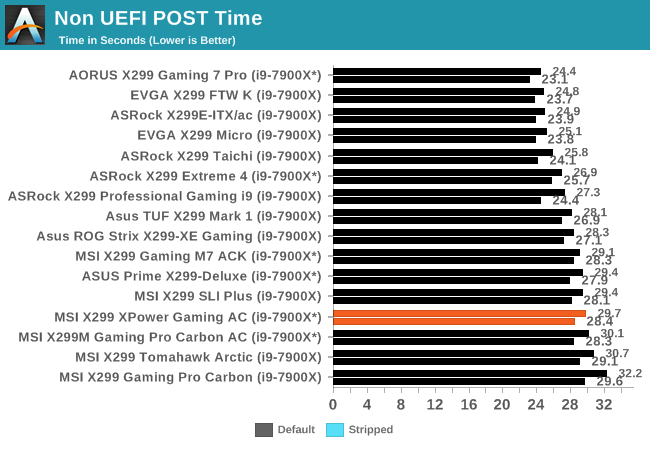
POST times on this board were just below 30 seconds leaving the XPower Gaming AC in the lower half of results. This result makes it the second quickest MSI board we have tested, however it is still in the lower third for boot times compared to the rest of the datasets.
DPC Latency
Deferred Procedure Call latency is a way in which Windows handles interrupt servicing. In order to wait for a processor to acknowledge the request, the system will queue all interrupt requests by priority. Critical interrupts will be handled as soon as possible, whereas lesser priority requests such as audio will be further down the line. If the audio device requires data, it will have to wait until the request is processed before the buffer is filled.
If the device drivers of higher priority components in a system are poorly implemented, this can cause delays in request scheduling and process time. This can lead to an empty audio buffer and characteristic audible pauses, pops and clicks. The DPC latency checker measures how much time is taken processing DPCs from driver invocation. The lower the value will result in better audio transfer at smaller buffer sizes. Results are measured in microseconds.
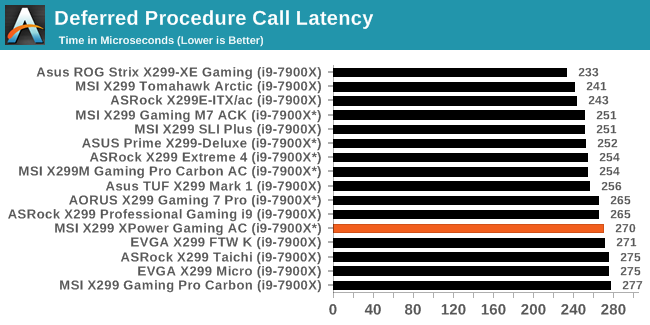
Our DPC Latency results are nothing extraordinary with another test sample fitting in notably under the 300-microsecond threshold. The X299 XPower Gaming AC showed 270 microseconds placing it in the bottom half of results.
CPU Performance, Short Form
For our motherboard reviews, we use our short form testing method. These tests usually focus on if a motherboard is using MultiCore Turbo (the feature used to have maximum turbo on at all times, giving a frequency advantage), or if there are slight gains to be had from tweaking the firmware. We leave the BIOS settings at default and memory at JEDEC for the supported frequency of the processor for these tests, making it very easy to see which motherboards have MCT enabled by default.
Rendering - Blender 2.78: link
For a render that has been around for what seems like ages, Blender is still a highly popular tool. We managed to wrap up a standard workload into the February 5 nightly build of Blender and measure the time it takes to render the first frame of the scene. Being one of the bigger open source tools out there, it means both AMD and Intel work actively to help improve the codebase, for better or for worse on their own/each other's microarchitecture.
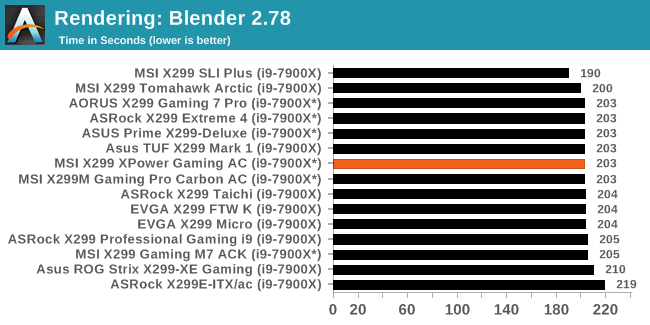
In the Blender testing, the MSI X299 completed the benchmark in 203 seconds which puts it towards the top third of results and in the middle of a tight group of results. The vast majority of boards run this benchmark and behave similarly.
Rendering – POV-Ray 3.7: link
The Persistence of Vision Ray Tracer, or POV-Ray, is a freeware package for as the name suggests, ray tracing. It is a pure renderer, rather than modeling software, but the latest beta version contains a handy benchmark for stressing all processing threads on a platform. We have been using this test in motherboard reviews to test memory stability at various CPU speeds to good effect – if it passes the test, the IMC in the CPU is stable for a given CPU speed. As a CPU test, it runs for approximately 1-2 minutes on high-end platforms.
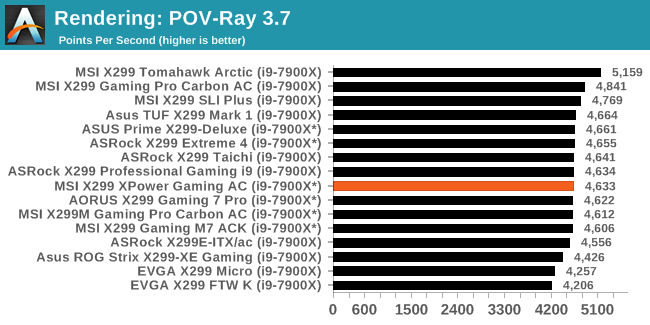
For our POV-Ray results, the Gaming XPower Gaming AC lands middle of results scoring 4,633. POV-Ray is sensitive to frequency with boards making the most of an MCE implementation leading the pack.
Compression – WinRAR 5.4: link
Our WinRAR test from 2013 is updated to the latest version of WinRAR at the start of 2014. We compress a set of 2867 files across 320 folders totaling 1.52 GB in size – 95% of these files are small typical website files, and the rest (90% of the size) are small 30-second 720p videos.
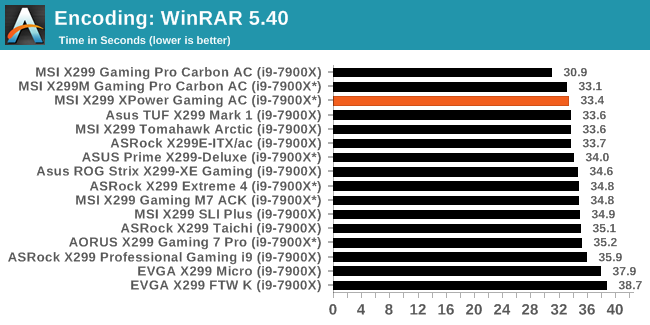
WinRAR data places the X299 Gaming Pro Carbon AC second at 33.4 seconds which is one of the faster results we have seen. All MSI boards, in general did quite well in this test. The MCE implementations on some MSI boards are more aggressive than others.
Synthetic – 7-Zip 9.2: link
As an open source compression tool, 7-Zip is a popular tool for making sets of files easier to handle and transfer. The software offers up its own benchmark, to which we report the result.
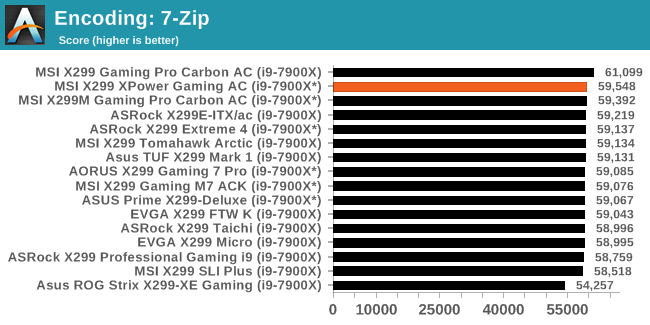
Our 7-Zip results are similar here with the XPower Gaming AC posting the second highest result on our testing. Here again, MSI's aggressive MCE has their boards rising to the top. Though again, all of these results are extremely close with only two results notably better or worse than the rest. As is typical, the board here ran the test at 4.0 GHz.
Point Calculations – 3D Movement Algorithm Test: link
3DPM is a self-penned benchmark, taking basic 3D movement algorithms used in Brownian Motion simulations and testing them for speed. High floating point performance, MHz, and IPC win in the single thread version, whereas the multithread version has to handle the threads and loves more cores. For a brief explanation of the platform agnostic coding behind this benchmark, see my forum post here.
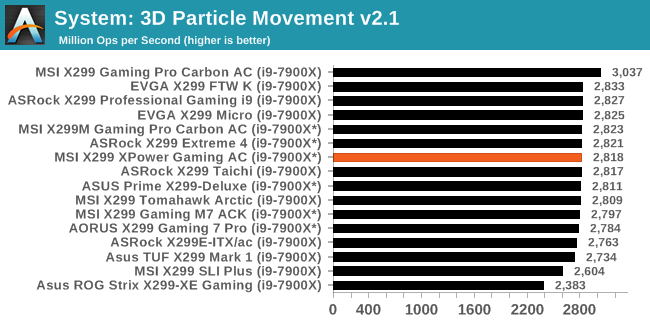
The 3DPM result lands the XPower on the top half of results, still in the middle of the pack. During this test it performs six mini-tests with a 10-second gap between them: our result is a 3.6 GHz CPU clock speed during the test as are most from this set of results.
Neuron Simulation - DigiCortex v1.20: link
The newest benchmark in our suite is DigiCortex, a simulation of biologically plausible neural network circuits, and simulates activity of neurons and synapses. DigiCortex relies heavily on a mix of DRAM speed and computational throughput, indicating that systems which apply memory profiles properly should benefit and those that play fast and loose with overclocking settings might get some extra speed up. Results are taken during the steady state period in a 32k neuron simulation and represented as a function of the ability to simulate in real time (1.000x equals real-time).

In the DigiCortex testing, this MSI board managed a middling result.
Gaming Performance
AoTS Escalation
Ashes of the Singularity is a Real Time Strategy game developed by Oxide Games and Stardock Entertainment. The original AoTS was released back in March of 2016 while the standalone expansion pack, Escalation, was released in November of 2016 adding more structures, maps, and units. We use this specific benchmark as it relies on both a good GPU as well as on the CPU in order to get the most frames per second. This balance is able to better display any system differences in gaming as opposed to a more GPU heavy title where the CPU and system don't matter quite as much. We use the default "Crazy" in-game settings using the DX11 rendering path in both 1080p and 4K UHD resolutions. The benchmark is run four times and the results averaged then plugged into the graph.

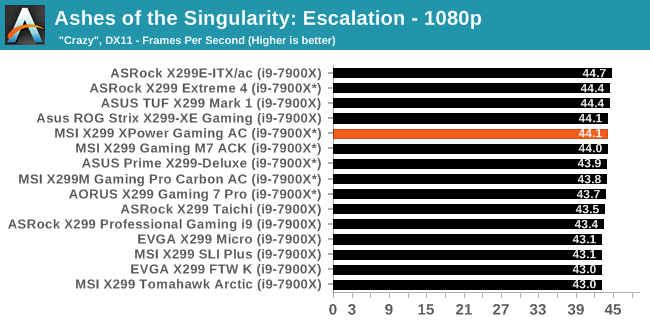
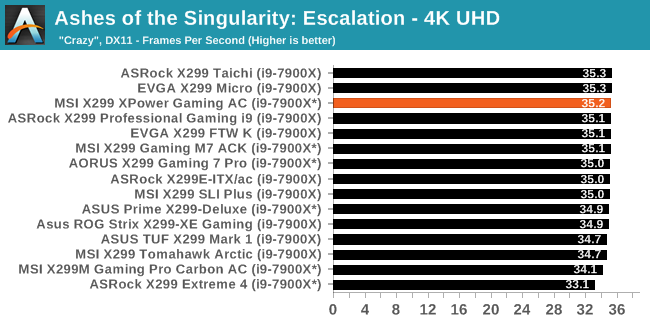
Our tight-knit AOTSe results find the XPower Gaming AC again above the middleputting up 44.1 FPS in our 1080p settings while averaging 35.2 in 4K UHD.
Rise of the Tomb Raider

Rise of the Tomb Raider is a third-person action-adventure game that features similar gameplay found in 2013's Tomb Raider. Players control Lara Croft through various environments, battling enemies, and completing puzzle platforming sections, while using improvised weapons and gadgets in order to progress through the story.
One of the unique aspects of this benchmark is that it’s actually the average of 3 sub-benchmarks that fly through different environments, which keeps the benchmark from being too weighted towards a GPU’s performance characteristics under any one scene.
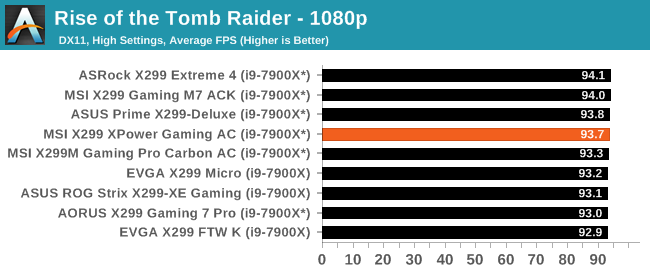
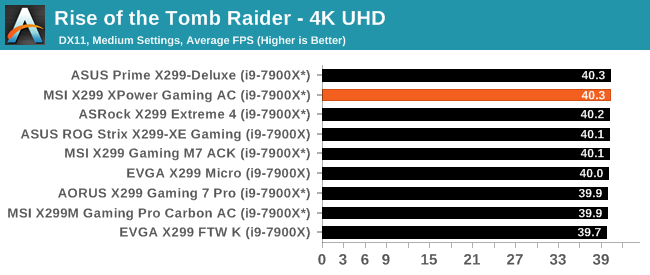
Rise of the Tomb Raider also continues its close results with the MSI board putting out 93.7 FPS at 1080p and 40.3 FPS using 4K UHD resolution - the latter matching the highest FPS in 4K testing for ROTR.
Overclocking
Experience with the MSI X299 XPower Gaming AC
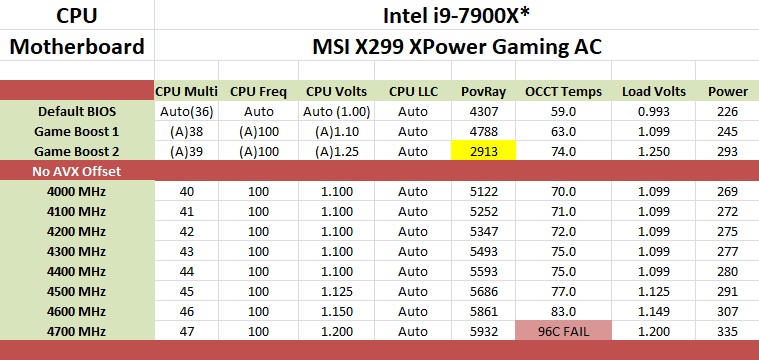
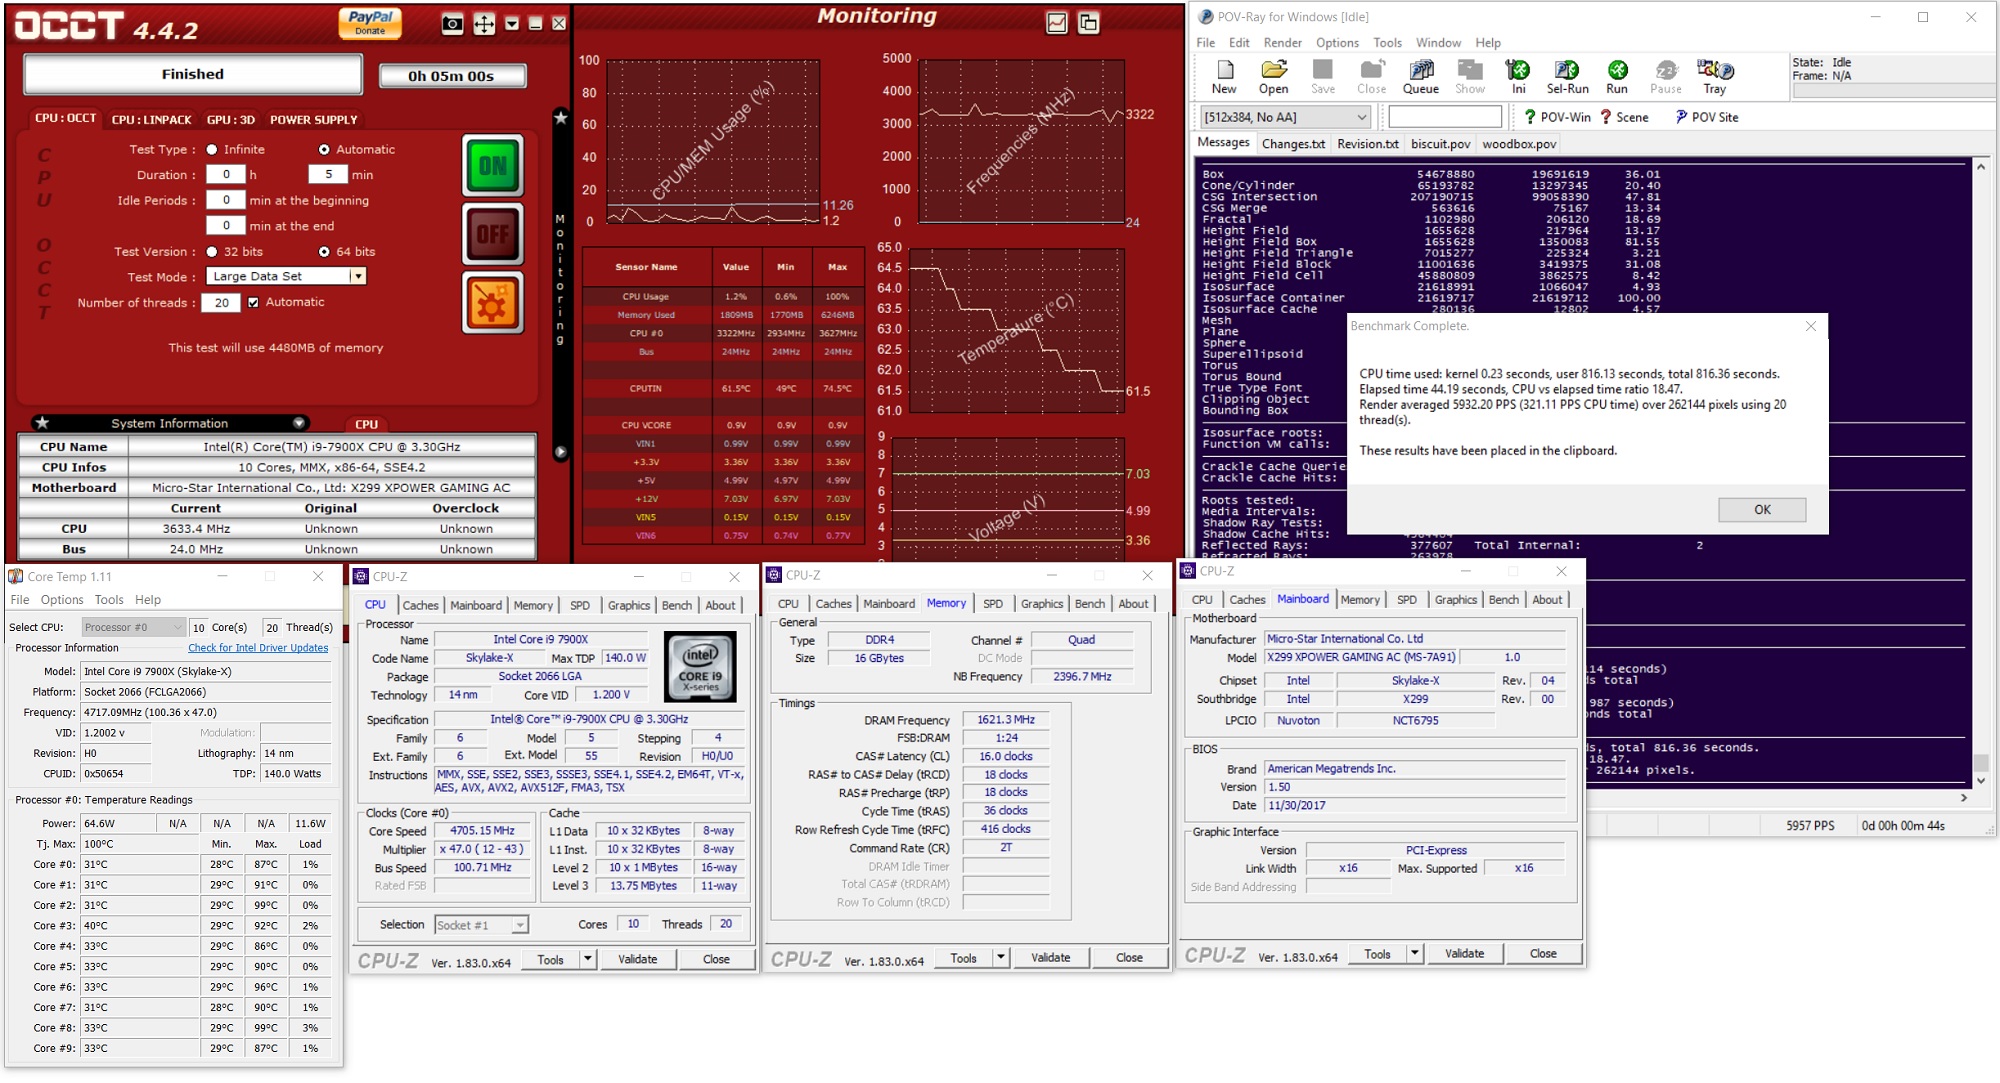
Overclocking the MSI X299 XPower Gaming AC was just as straightforward as most any other board. The BIOS options are easy to find and most items are on the first page or one level down making finding and changing options quick and painless. The VRM handled up to 4.7 GHz as we blasted up to our self-imposed 90C temperature limit. Running 4.5 GHz and 1.125V (1.9V Input), the VRMs peaked at 71°C in our extended stress test which is a good result. The board will not have trouble keeping the VRMs cool.
The Game Boost functionality which promises one-touch overclocking assuming you have the right cooling, was a disappointment here, as it has been on other MSI boards. The knob can go up to 11, however, we were only able to use the first level, just like we saw on the Gaming M7 ACK. At this setting, the single core limits are up to 4.4 GHz while all core AVX loads get a 200 Mhz bump to 3.8 GHz. This worked out well. It was when we moved to level 2 where things went awry. The voltage was set to 1.25V, a huge jump, for clocks to raise 100 Mhz all around (4.5 GHz single core 3.9 GHz all core AVX). We started to run POV-Ray and saw current throttling out of the gate which cut performance results nearly in half. Manually raising the current limit to the max via Intel XTU was not successful, but disabling power limits in the BIOS allowed us to get past that hurdle. The software setting 1.25V was simply too much for this cooling to handle and we were forced to stop there. In the end, Game Boost brought us one very minor step up from stock leaving the other seven options unusable without a significant bump in cooling performance, delidding, or both.
The board did not run into any issues with either the DDR4-2666 or the DDR4-3200 sets of RAM we use for testing. Like the other X299 boards, it was 'set XMP and go'. We were able to overclock past the XMP settings of our 3200 sticks and reached DDR4-3600 speeds without issue as well.
The Command Center software is one of the more complete windows based utilities offering monitoring and control over the system. There are options to set up custom fan curves, overclocking, and even memory (though I prefer to do so in the BIOS). For those concerned, it will display MOSFET temperatures (as does the BIOS).
The MSI X299 XPower Gaming AC is a more than capable overclocking motherboard. Game Boost needs to be tweaked to be more useful, but it has all the bells and whistles for manual overclocking and didn't balk during out testing. If extreme overclocking is your thing, the board has plenty of features such as voltage read points, slow mode, BCLK generator, and buttons on the motherboard for on the fly increases in BCLK or CPU ratio which most boards do not have.
Overclocking Methodology
Our standard overclocking methodology is as follows. We select the automatic overclock options and test for stability with POV-Ray and OCCT to simulate high-end workloads. These stability tests aim to catch any immediate causes for memory or CPU errors.
For manual overclocks, based on the information gathered from the previous testing, starts off at a nominal voltage and CPU multiplier, and the multiplier is increased until the stability tests are failed. The CPU voltage is increased gradually until the stability tests are passed, and the process repeated until the motherboard reduces the multiplier automatically (due to safety protocol) or the CPU temperature reaches a stupidly high level (90ºC+). Our test bed is not in a case, which should push overclocks higher with fresher (cooler) air.
Overclocking Results
The MSI X299 XPower Gaming AC topped out at 4.6 GHz when keeping things under 90C with the processor. Due to our test bench cooling solution, we are temperature limited and without a larger custom cooler and possible delid of the CPU, we are unable to push further. There was very little or no vdrop and vdroop with LLC set to auto. This board has voltage read points and the values listed in the table below are from the Digital Multi-Meter (and matched Core Temp, the software used to read the Vcore). All boards we have tested were very stable with voltages not needing any manual adjustment to keep load voltage close to what was set in the BIOS. At the top overclock of 4.6 GHz and 1.149V, the system pulled 307W at the wall with the CPU itself claiming about 200W of that value.
Conclusion
The XPower Gaming AC is the best of what MSI has to offer in X299 form. If bells and whistles are your thing, it has just about one of each.
- Five total M.2 slots with full bandwidth? Check.
- Ten SATA ports? Check. U.2 port? Check.
- Dual NICs and Wi-Fi? Check.
- Ten hybrid fan/pump headers? Check.
- Robust power delivery and VRM heatsink? Check.
- USB 3.1 ports on the back and front panel? Check.
- Features for extreme overclocking? Check.
The list goes on, but as we have seen over the past few pages, the XPower Gaming AC has just about everything one can have on this platform. If it was missing anything, it would be a 10 GbE port (as are all but one or two X299 boards).
The power delivery and heatsink configuration kept the power delivery well within its specified temperature range even while overclocking, peaking at 71C during the extended OCCT testing. We did hit 4.7 GHz with this CPU without issue. Overall, the board is a more than capable overclocker. I wish I had some time and a full dewar of liquid nitrogen to push it further.
All three M.2 slots on the board are heatsinked with the primary M.2 slot using a larger and heavier piece of metal to keep what is underneath it cool. Unfortunately that M.2 slot is not the one that is powered by the CPU: the third one is instead. There is a total of 10 USB ports on the back from USB 2.0 up to USB 3.1 (10 Gbps), which is more than we see on most boards.
MSI's software worked without issue for our uses in testing. The Live Update app picked up and installed the latest drivers just fine. The Command Center software is one of the more complete Windows-based software applications for motherboards around. Users are able to control all the fans with it off of any of the 10 hybrid headers, make adjustments for overclocking (BCLK/CPU Ratio/Voltages/RAM Timings etc), or just monitor the system status.

The overall build quality on the XPower was solid. The included metal shield on the back cover protects any pertinent bits under it, and also reinforces the motherboard. This shield is not connected to anything outside of the mount points so it is for aesthetics and rigidity only. The dual heatsinks for cooling the power delivery area kept temperatures in an acceptable range, well under any thresholds for the hardware so users should be set in that respect.
Performance in our testing was again solid with the XPower Gaming AC results generally landing in the top half of results in nearly all testing. Power use was a bit high in idle states and boot times were a bit slower than the most of the datasets we have, otherwise, that is really the only shortcomings. In the end, our results show the board boosted and used its MCE like the majority of boards we tested.
The MSI X299 XPower Gaming AC's $440 price tag and features have it competing with boards that are also full of features. The ASUS Prime X299-Deluxe is $475 but has less SATA ports and two M.2 ports compared with the five possible out of the box with the XPower, but has a unique OLED display. ASRock's flagship Fatal1ty X299 Professional Gaming i9 XE costs $390 and gives you 10 GbE onboard, ten SATA ports, and three M.2 slots - though it is missing U.2 connectivity if that is important. The other offering in that price range is GIGABYTE's X299 flagship Designare EX at $450, which also three well heatsinked M.2 slots but is also missing out on the U.2 port. Clearly, this isn't an exhaustive rundown for feature comparison, but I did want to point out some of the high-level differences. The appearance of the board, use case, and how necessary dome features are will point users to the right board for them. In this price range, do like the XPower Gaming AC's price point and feature set in comparison with the other boards we listed, especially if there are plans to be M.2 drive heavy.
The MSI X299 XPower Gaming AC is, overall a good motherboard capable of supporting the most power hungry CPUs for the platform. There are enough features here to support the board as a flagship offering. The overclocking ability is there, as are nearly all the features users could want. The XPower's selling point, in this reviewer's opinion, is in the extra features. For anyone building an extreme HEDT system, with a good CPU and multiple PCIe devices with high storage requirements, the MSI X299 XPower Gaming AC fits the bill.
Other AnandTech X299 Motherboard Reviews:
- The Intel Skylake-X Review: Core i9-7980XE and Core i9-7960X Tested
- The Intel Skylake-X Review: Core i9-7900X, i7-7820X and i7-7800X Tested
- The Intel Kaby Lake-X Review: Core i7-7740X and i5-7640X Tested
- Intel Announces Basin Falls: The New High-End Desktop Platform and X299 Chipset
- ($480) The ASUS Prime X299-Deluxe Review [link]
- ($450) The MSI X299 XPower Gaming AC Review (this review)
- ($400) The GIGABYTE X299 Gaming 7 Pro Review [link]
- ($390) The ASRock X299E-ITX/ac Review [link]
- ($390) The ASRock X299 Professional Gaming i9 Review [link]
- ($370) The ASUS Strix X299-XE Gaming Review [link]
- ($366) The MSI X299 Gaming M7 ACK Review [link]
- ($340) The ASUS X299 TUF Mark 1 Review [link]
- ($330) The EVGA X299 FTW-K Review [link]
- ($308) The MSI X299 Gaming Pro Carbon Review [link]
- ($305) The MSI X299M Gaming Pro Carbon AC [link]
- ($290) The EVGA X299 Micro Review [link]
- ($290) The ASRock X299 Taichi Review [link]
- ($260) The MSI X299 Tomahawk Arctic Review [link]
- ($232) The MSI X299 SLI Plus Review [link]
- ($200) The ASRock X299 Extreme4 Review [link]
To read specifically about the X299 chip/platform and the specifications therein, our deep dive into what it is can be found at this link.


